Simple Instructions on Installing and Setting Bathroom Floor Tiles
By Mark J. Donovan
|
|
Setting bathroom floor tile is a project that many homeowners tackle every weekend. However before starting a bathroom floor tile installation project it is important that you do a little upfront research and preparation.
Bathroom Floor Tile Preparation To install bathroom floor tile properly I prefer to remove the toilet and bathroom vanity from the bathroom. In addition, I remove all of the existing baseboard trim. Leaving these items in the bathroom complicate the tiling process and usually result in less than a professional look. Leaving a toilet in place, for example, requires a lot more complicated tile cuts then simply temporarily removing the toilet. |
It is important when setting bathroom floor tile that the subfloor is level and rigid. There should be no deflection in the subfloor. Otherwise your tiles may wind up breaking or loosening over time. The subfloor usually consists of a concrete floor, or a ¾” tongue and grooved plywood subfloor with another top layer of either ¼” exterior grade plywood or cement backer board. It is imperative that the top layer be thoroughly screwed down with coarse threaded deck or drywall screws.
I typically install screws on 6” centers across the entire surface area of the bathroom floor.
| Thinset Mortar or Mastic for Setting Bathroom Floor Tiles
When setting bathroom floor tiles, you should always use a latex modified thinset mortar. Laying out Bathroom Floor Tiles When installing and setting bathroom floor tiles it is always important to first layout a couple of test rows and columns of tiles in an X-Y pattern. |
 |
Lay the bathroom ceramic floor tiles out on the bare subfloor without any mortar applied to the subfloor. Place your test rows and columns of tiles in the center of the bathroom to see where tiles will need to be cut along the bathroom wall edges. Also make sure to space the tiles according to your desired joint widths. Ideally you want to locate rows or columns of cut ceramic tiles in less observed areas, and preferably so that you only need to make cuts along 1 or 2 wall edges.
Once you have figured out roughly where to start your tiles to reduce the visibility of cut tiles, make a couple of marks on the subfloor with a pencil. The marks should be made next to a couple of the tiles that are roughly centered on the bathroom floor. Then use a tape measure and a straight edge to draw horizontal and vertical perpendicular lines from the center of the subfloor and coincident with the pencil marks. In addition, draw additional parallel lines to these main horizontal and vertical center lines to help maintain straight lines when setting the bathroom floor tiles.
| Setting Bathroom Floor Tiles
After you have made your reference lines, prepare some latex modified thinset mortar and begin the process of setting the bathroom floor tiles. Mix up only enough thinset mortar to allow you to set about 30 to 45 minutes of ceramic floor tiles. Also, do not add water to the thinset mortar if it begins to stiffen up. Doing so will weaken the ability of the thinset mortar to bond the tile to the subfloor adequately. When setting bathroom ceramic floor tiles, start at the intersection of your two main horizontal and vertical lines and work your way outwards in the direction of one wall. Make the necessary tile cuts along the wall edge to complete the first section of installed tiles. |
 |
Also, make sure to space the bathroom floor tiles properly. You can purchase tile spacers to help in this process. They come in a variety of different widths.
Starting from the center lines again, continue to set ceramic bathroom floor tiles in the other directions, again using your reference lines to keep the ceramic tiles running straight.
After setting the bathroom floor tile, allow the thinset mortar to set up for 24 hours before grouting.
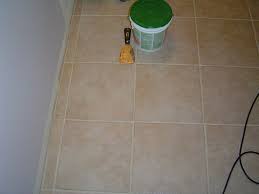
Grouting Bathroom Ceramic Floor Tile
To grout bathroom ceramic floor tile, use grout with a grout additive to ensure a solid bond to the ceramic floor tile. Use a tile float to work the grout into the ceramic tile joints. Make sure to hold the float at about a 33 to 45 degree angle and run the tile float across the joints at a 45 degree angle when applying the grout.
Immediately after grouting the bathroom floor tile, wipe the tile down with a damp sponge and a bucket of water. You will need to continuously rinse the sponge.
After sponging down the bathroom ceramic floor tile, repeat the process two more times at 30 minute intervals.
Allow the grout to set up for 24 to 48 hours before reinstalling the toilet, bathroom vanity and baseboard trim.
For information on installing a shower pan membrane liner for a ceramic tile shower, see the Shower Pan Membrane Liner Installation Ebook from HomeAdditionPlus.com. The Shower Pan Membrane Liner EBook will quickly teach you the step-by-step process for installing the shower pan membrane liner correctly. It includes instructions on framing the shower stall, pouring the pre-slope and shower base mortar, and installing the shower pan membrane liner.
See HomeAdditionPlus.com’s Ceramic Tile Calculator
See my “How to Tile a Custom Ceramic Tile Shower” Ebook to learn how to tile your own shower: For a detailed set of instructions on tiling a shower floor and walls, including pictures for every step in the process, see my “How to Tile Custom Ceramic Tile Shower Ebook”.
Related Information
Additional Ceramic Tile Resources from Amazon.com
 |
 |
 |
Get Free Bathroom Remodeling Price Quotes with No Obligation!
Fill out our 3-5 minute quick and easy form, and receive a free price quote on a bathroom remodeling project from one of our pre-screened and licensed bathroom remodeling contractors. This process is free and there is no obligation to continue once you receive your bathroom addition price estimate.