Deicing Heat Cables are Ideal for Preventing Ice Dams and Water Damage to the Home
By Mark J. Donovan
|
|
In preparation for this winter I decided to install a deicing roof heat cable along the north side of my roof. Due to limited daylight hours during the winter months here in New Hampshire, snow and ice buildup on roofs is quite common, particularly on northern and eastern facing roof lines.
In years previous I’ve either allowed the snow and ice to melt off at its own pace, or I’ve used a snow rake to remove the snow near the roof edges. I’ve even used snow melt socks with some success. However, I figured this year I’d try a deicing roof heat cable instead. |
The installation of the deicing roof cable was very easy, albeit I had to spend a couple of hours high up on a ladder. But besides having to readjust the position of the ladder every couple of feet the job was a piece of cake. All that was required to install the deicing heat cable was a pair of pliers and a putty knife.
| Though our home’s roof was properly shingled, and includes ice and water shield within the first 6 feet of the roof eaves, I’ve still had concerns when I’ve seen several inches of ice build up along the roof eaves. Ice dams along roof eaves are notorious for causing water damage within the home as melting snow water backs up under the shingles and into the attic. From there it inevitably ends up staining and damaging ceilings and interior walls. Climbing up ladders in the dead of the winter to scrape away roof snow buildup is a hassle, time consuming, and dangerous. So this year, I decided I’d give deicing roof heat cables a try. | 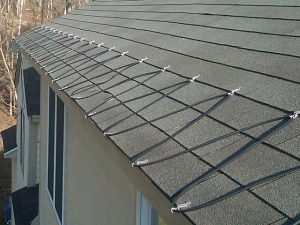 |
The key to buying a dicing heat cable is to purchase one that is long enough to do the job, but not excessively long. Start by measuring the length of roof line you want to install dicing roof heat cable. Also measure the depth of the soffits under the roof eaves. In addition, if you have gutters along the roof line where you want to install the heat cable, you’ll need to account for their linear feet when choosing your heat cable length. Then visit your local home improvement center and read the instructions on the back of the roof heat cable box to determine what length is necessary for your particular roof line.
| When installing deicing roof heat cable you’ll want to mount it on the roof in a continuous triangular pattern. The deicing cable triangle peaks should extend upwards from the edge of the roof eaves to a point where they extend over the attic area. More specifically, the triangle peaks should extend just beyond the vertical plane of the exterior walls. Based on the width of the soffit, typically the heat cable triangle peaks should extend up to the bottom of the 3rd or 4th course of shingles.
Keep in mind that the end of the roofing heat cable will need to plug into a properly rated electrical outlet. The electrical outlet also needs to be on a ground fault circuit interrupter (GFCI) circuit. We were fortunate to have a 20amp rated GFCI electrical outlet on the side of our home that the deicing roof heat cable could plug into. |
 |
As I mentioned earlier, the deicing roof heat cable installation was a breeze, other than the fact of having to continuously adjust the ladder. Once the ladder was put into position at a point that was farthest away from the electrical outlet, I simply installed the clips onto the bottom tabs of the shingles. At the roof eave, I installed a mounting clip every 15 inches to the first course of shingles. I also installed mounting clips at the bottom of the 3rd course of shingles, centered between the clips at the roof eaves. The putty knife helped to loosen up the base of the shingles to slide the mounting clips into place.
After installing mounting clips along 3 to 4 feet of the roof line, I snapped the deicing roof heat cable into the mounting brackets. I also used a pair of pliers to ensure that they were tightly clamped into place. I then continued this process along the entire roof line. Since I had no gutters to contend with, I then ran the remaining portion of the deicing roof heat cable down an exterior wall. From there I attached a 14 gauge extension cord to it. The other end of the extension cord was positioned near the GFCI electrical outlet. And with that, the installation of the roof heating cable was complete.
It’s mid December now as I write this article, and I’m still waiting for the first snow storm to test out my new deicing roof heat cable. However, I’m confident it will do an excellent job of melting the roof ice, and preventing the need for me to have to go up on a ladder and scrape the roof. Later on this winter I’ll report back my results with the deicing heat cable.
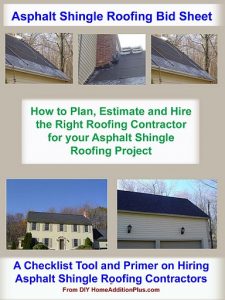
For more help on Shingling Your Home’s Roof, see HomeAdditionPlus.com’s Asphalt Shingle Roofing Bid Sheet. The Asphalt Shingle Roofing Bid Sheet will help to ensure that your roof won’t end up with a blue tarp over it and a dumpster sitting in your yard for weeks as you wait for the roofing contractor to come back and finish roofing your home.
Asphalt Shingle Roofing Cost Estimator
Related Roofing Information
- The Importance of Roof Snow Removal
- Roof Maintence and Inspection Should be Done Regularly
- How to Make and Use Ice Melt Socks for Ice Dam Removal
Additional Roofing Resources from Amazon.com
 |
 |
 |
 |
Roofing Price Quotes For FREE, No Obligation!
Fill out our 3-5 minute quick and easy form, and receive a free price quote on roofing from one of our prescreened and licensed roofing contractors. This process is free and there is no obligation to continue once you receive your roofing price estimate.