How to Repair a Toilet Flapper that is Causing a Running Toilet
By Mark J. Donovan
|
|
A Toilet flapper plays a key role in the proper functioning of your toilet. A warped or damaged toilet flapper can cause your toilet to constantly run causing annoyance and higher water bill costs. Toilet flapper repair or replacement is a simple do it yourself project and a replacement toilet flapper will only set you back a few dollars.
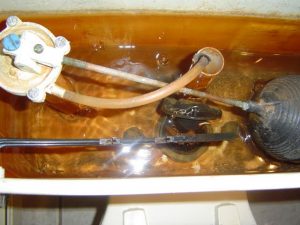
To understand how a toilet flapper works, its best to remove the toilet tank lid. With the lid off, you should notice that the toilet tank lever is connected to a chain. The other side of the chain should be connected to the toilet flapper. When examining this assembly check to make sure the chain is not in any way sitting underneath the toilet flapper. |
Occasionally, if the chain is too long, the chain can become wedged between the toilet flapper and toilet tank valve seat. If you see this is the case your toilet flapper repair job is very simple. Simply pull the chain out from underneath the toilet flapper and adjust the chain length so that it cannot inadvertently get stuck underneath the toilet flapper.
| If the toilet lever and chain assembly look like they are connected properly, push down on the toilet tank lever as you normally would. You should observe that one end of the toilet flapper lifts up. When this happens water rushes out of the toilet tank and fills the toilet bowl, causing the flushing action. After a couple of seconds the toilet flapper should close over the toilet tank valve seat and water should begin to fill up again in the toilet tank.
If you hear or see water continuously draining into the toilet bowl, even after the water has reached its maximum height in the toilet tank then most likely the toilet flapper is damaged or deformed. |
 |
The toilet flapper can become damaged due to a variety of reasons including the use of toilet bowl chemicals that are stored in the toilet tank. The chemicals can effectively eat away at the rubber toilet flapper to the point that it does not sit tightly over the toilet tank valve seat. Alternatively, the toilet flapper can also become deformed in shape, so that again it does not seat well on the toilet tank valve seat. In addition, minerals in the water can collect on the toilet flapper and toilet tank valve seat so that the toilet flapper does not close fully.
| If you do hear or see water continuously draining into the toilet bowl, one simple toilet flapper repair that you can try, is wiping off the toilet flapper and toilet tank valve seat with a rag. To do this, first turn off the water supply inlet valve to the toilet. Then flush the toilet to drain much of the water out of the toilet tank. Finally use a rag to wipe down the surface areas of the toilet flapper and toilet tank valve seat.
Turn the water supply inlet valve to the toilet back on and let the toilet tank fill. If you no longer hear or see water running into the toilet bowl after the tank fills, your toilet flapper repair job is complete. If, however, the toilet continuous to run even after the toilet tank is full, then again turn off the water supply inlet valve and flush the toilet. |
 |
Now remove the toilet flapper from the overflow pipe and disconnect the chain from the toilet flapper. Take the toilet flapper to a home improvement store and find a replacement toilet flapper.
When you return home, install the new toilet flapper, turn on the water to the toilet tank and let it fill. Again, listen and look for any signs of the toilet still running after the toilet tank has filled. With any luck, your running toilet problem should be history and you will have completed your first toilet flapper repair project.
For information on installing a shower pan membrane liner for a ceramic tile shower, see the Shower Pan Membrane Liner Installation eBook from HomeAdditionPlus.com. The Shower Pan Membrane Liner EBook will quickly teach you the step-by-step process for installing the shower pan membrane liner correctly. It includes instructions on framing the shower stall, pouring the pre-slope and shower base mortar, and installing the shower pan membrane liner.
For information on how to tile a custom ceramic tile shower, see the “How to Tile a Custom Ceramic Tile Shower eBook” from HomeAdditionPlus.com. This eBook will quickly provide you with step-by-step instructions on how to measure and install ceramic tile in a shower, including the installation of tile on shower walls, floors and curbs. It provides detailed instructions for every step in the process of tiling a custom ceramic tile shower and is loaded with instructional pictures!
Related Information
- How to Replace a Toilet Tank Lever Video
- How to Install a Toilet
- How to Install a Toilet Tank Fill Valve Video
Additional Plumbing Resources from Amazon.com
 |
 |
Get Free Bathroom Remodeling Price Quotes with No Obligation!
Fill out our 3-5 minute quick and easy form, and receive a free price quote on a bathroom remodeling project from one of our pre-screened and licensed bathroom remodeling contractors. This process is free and there is no obligation to continue once you receive your bathroom addition price estimate.