How to Install a New Toilet Tank Flush Valve
By Mark J. Donovan
|
|
If your toilet is leaking it is either related to a failed toilet flapper, sticking float assembly, or a failed toilet tank fill valve or toilet tank flush valve, depending upon you particular toilet model. Installing a toilet tank flush valve is a little bit involved, as you need to separate the toilet tank from the bowl, however it is something most handy Do-it-Yourselfers can do. Note that unlike a toilet tank fill valve, a toilet tank flush valve includes the overflow tube pipe and the flapper assembly all in one.
To install a new toilet tank flush valve first turn the water supply line valve off. You can find the supply line valve underneath the toilet tank, on either the floor or wall. |
Then remove the toilet tank lid and store it in a safe location where it cannot be damaged.
Next use a bucket and either a sponge or large rag to sop up any residual water in the base of the toilet tank.
| After sopping up the residual water in the toilet tank disconnect the end of the water supply line tube that connects to the toilet tank base. You should be able to disconnect it with your fingers, however you may need an adjustable pair of pliers to initially loosen it. Note, keep you bucket or rag handy to catch any residual water in the toilet tank.
Once you have emptied the tank use a large common screw driver and an adjustable wrench to loosen and remove the toilet tank bolts that hold the tank to the toilet bowl. |
 |
It is important to exercise caution while doing this, because if you are not careful you could crack the tank or bowl.
After removing the toilet tank bolts, lift the toilet tank up off of the bowl and set it on a large old towel.
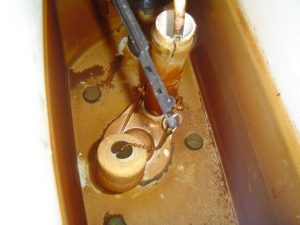
| Next, at the base of the toilet tank you will find a large nut that secures the toilet flush valve to the tank. Remove this nut and the old toilet flush valve.
After removing the old toilet tank flush valve examine the large toilet tank/bowl gasket to determine if it is worn and needs replacing. If it looks okay, then you can move forward with the toilet tank flush valve installation. To install the toilet tank flush valve, place the unit inside the toilet tank and secure it to the base of the tank with the large plastic nut. Initially use your fingers to tighten the plastic nut and then snug it down with the adjustable wrench or pliers. |
 |
Next place the toilet tank onto the toilet bowl making sure to position it carefully over the large toilet tank/bowl gasket.
| Then insert the two large tank bolts and associated rubber gaskets into the base of the tank. Attach the nuts and associated washers and rubber gaskets to the back of the bolts, underneath the back rim of the toilet bowl. Snug them down finger tight initially and then with an adjustable wrench. Make sure you do not over-tighten them to avoid cracking the toilet tank or bowl.
Once the toilet tank has been mounted, fasten the flapper chain to the flush rod. Next, connect the supply line back up to the base of the toilet tank. |
|
Finally, turn the supply line valve back on and let the toilet fill. If all was done properly your toilet should work properly and be leak free again.
For information on installing a shower pan membrane liner for a ceramic tile shower, see the Shower Pan Membrane Liner Installation eBook from HomeAdditionPlus.com. The Shower Pan Membrane Liner EBook will quickly teach you the step-by-step process for installing the shower pan membrane liner correctly. It includes instructions on framing the shower stall, pouring the pre-slope and shower base mortar, and installing the shower pan membrane liner.
For information on how to tile a custom ceramic tile shower, see the “How to Tile a Custom Ceramic Tile Shower eBook” from HomeAdditionPlus.com. This eBook will quickly provide you with step-by-step instructions on how to measure and install ceramic tile in a shower, including the installation of tile on shower walls, floors and curbs. It provides detailed instructions for every step in the process of tiling a custom ceramic tile shower and is loaded with instructional pictures!
Related Information
- How to Replace a Toilet Tank Fill Valve
- How to Resolve a Humming Toilet Tank Fill Valve Problem
- How to Install a Toilet Tank Fill Valve Video
Additional Plumbing Resources from Amazon.com
 |
 |
Get Free Bathroom Remodeling Price Quotes with No Obligation!
Fill out our 3-5 minute quick and easy form, and receive a free price quote on a bathroom remodeling project from one of our pre-screened and licensed bathroom remodeling contractors. This process is free and there is no obligation to continue once you receive your bathroom addition price estimate.