Step-by-Step Instructions for Fixing a Leaky Hose Bib
By Mark J. Donovan
|
|
Question: Mark, I have a 50 year old home and I am trying to keep up with the maintenance on it to avoid costly repairs. I have two leaky hose bibs that after shutting them off they drip. Is fixing a leaky hose bib something a lowly skilled diy homeowner can tackle? I appreciate your advice. Thanks, J.N.
Answer: J.N, if your hose bib or outdoor faucet is leaking you typically can fix it with just a couple of tools and a replacement washer or two. To fix a leaky hose bib that is dripping at the handle or packing nut, the leak is most likely associated with the packing nut washer or graphite packing string that sits behind the packing nut. |
If the leak is coming from the faucet itself then most likely the leak is associated with the compression washer that sits in the hose bib faucet assembly. In both cases these washers can lose their resiliency overtime and begin to allow water to seep around them.
| Replace Packing Washer on Leaky Hose Bib
To fix a leaky hose bib that is dripping around the faucet handle, first turn water off to the hose bib at the inside valve. Then turn the faucet handle all away to the on position. No water should come out of the faucet. Next remove the screw or nut that is holding on the faucet handle using a screwdriver or wrench. Then remove the faucet handle. |
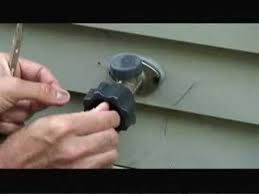 |
Now, using an adjustable wrench, remove the packing nut that sits behind the faucet handle.
After removing the packing nut, you’ll notice a packing washer or graphite packing string sitting behind the nut. Remove it with as small flat head screw driver.
Replace the packing washer with the exact same size one. If graphite packing string was used, remove the residual packing string and replace it with new graphite packing string. Reattach the packing nut and handle to the hose bib and turn water back on to the hose bib. Test to see if you’ve fixed your leaky hose bib.
| Replace Compression Washer on Leaky Hose Bib
To fix a leaky hose bib that is dripping out of the faucet itself, again make sure you’ve first turn water off to the outdoor faucet. Then turn the faucet valve all the way to the on position. No water should come out of it. Then remove the faucet handle and the packing nut and check to see if the packing washer or graphite packing string needs to be replaced. Next remove the entire faucet valve assembly with your adjustable wrench. Make sure to grasp the base of the hose bib while you loosen the faucet assembly with your wrench.After removing the faucet valve assembly you will observe the compression washer. Replace the compression washer with a new one of exactly the same dimensions. You will notice that there is a screw that holds the compression washer in place. You will need to remove this screw to replace the compression washer. |
 |
With the faucet handle reattached to the faucet assembly and in the open position, and the packing nut loosely reattached to the faucet assembly, reattach the faucet valve assembly to the hose bib. Then tighten up the packing nut and turn the faucet handle to the off position. Finally turn water back on to the hose bib and test the hose bib. With any luck you have fixed your leaky hose bib.
For information on installing a shower pan membrane liner for a ceramic tile shower, see the Shower Pan Membrane Liner Installation eBook from HomeAdditionPlus.com. The Shower Pan Membrane Liner EBook will quickly teach you the step-by-step process for installing the shower pan membrane liner correctly. It includes instructions on framing the shower stall, pouring the pre-slope and shower base mortar, and installing the shower pan membrane liner.
For information on how to tile a custom ceramic tile shower, see the “How to Tile a Custom Ceramic Tile Shower eBook” from HomeAdditionPlus.com. This eBook will quickly provide you with step-by-step instructions on how to measure and install ceramic tile in a shower, including the installation of tile on shower walls, floors and curbs. It provides detailed instructions for every step in the process of tiling a custom ceramic tile shower and is loaded with instructional pictures!
Related Information
- How to Install a New Faucet
- How to Fix a Leaky Faucet
- How to Repair Silcock when Leaks from Cap on Top
- How to Replace a Leaky Bathtub Faucet Valve Stem
- How to Replace an Anti-Siphon Valve on an Outdoor Faucet
Additional Plumbing Resources from Amazon.com
 |
 |
Get Free Bathroom Remodeling Price Quotes with No Obligation!
Fill out our 3-5 minute quick and easy form, and receive a free price quote on a bathroom remodeling project from one of our pre-screened and licensed bathroom remodeling contractors. This process is free and there is no obligation to continue once you receive your bathroom addition price estimate.