Step-by-Step Instructions on Fixing a Leaky Faucet
By Mark J. Donovan
|
|
Instead of calling in a plumber and spending a small fortune on fixing a leaky faucet, learn how to fix a leaky faucet in 5 minutes. Summarized below are a couple of methods for diagnosing and fixing a leaky faucet.
There are two common types of faucets, a single handle faucet and a two handle faucet. I describe how to fix both types of faucets. Tools Required for Fixing a Leaky Faucet To fix a leaky faucet you will need a few basic tools. The most common tools required include channel lock pliers, a common screwdriver, a Philips screwdriver, needle nose pliers and a wrench. |
How to Fix a Single Handle Leaky Faucet
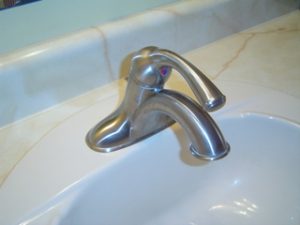
With single handle faucets the problem usually is associated with a worn out O-ring.
To fix a single handle leaky faucet, first turn off water to the faucet by shutting off the water supply valves underneath the sink.
Next, push the handle of the faucet to the ON position to make sure water is indeed turned off to the faucet.
| Remove the cap cover from the top of the faucet handle that is causing the leak. The small common screwdriver may come in handy here to remove the cap.
Next, using a Philips screwdriver remove the screw that holds the handle to the faucet valve stem. Once the screw has been removed, use a wrench to unscrew the nut that secures the faucet valve stem to the faucet. |
 |
Now remove the handle assembly from the leaky faucet. There is usually a small screw located on the backside of the faucet handle. Sometimes it may be covered by a small plastic decorative piece. If there is a plastic piece covering the screw, pry it off with your common screwdriver.
Next, remove the nut that holds the valve assembly to the faucet housing and lift the valve assembly out of the faucet housing. You will need your channel lock pliers to remove the nut, and either your common screwdriver or needle nose pliers to pry the valve assembly out.
Once you have removed the valve assembly, go to your local hardware store and find either an entire replacement valve assembly or the O-rings that are associated with the particular valve assembly you have.
Place the new faucet valve assembly into the faucet housing. If you bought replacement O-rings, install them onto the old valve assembly and then install the valve assembly into the faucet housing.
Reinstall the nut onto the faucet housing and tighten snuggly.
Next reattach the faucet handle and position the handle in the OFF position.
| Turn the supply line valves back on and push the faucet handle to the ON position. Check to make sure that the leak has been resolved. With any luck you have fixed your leaky faucet.
How to Fix a Two Handle Leaky Faucet The steps required for fixing a two handle leaky faucet are very similar to fixing a single handle leaky faucet. With a two handle leaky faucet, however, the problem typically is associated with only one of the handles. To isolate what faucet handle is the culprit, first turn the hot supply line valve off and observe if the leaky faucet stops leaking. If so, then you know your issue is with the hot water handle. |
 |
If the faucet continues to leak after turning off the hot water supply line, turn off the cold supply line and see if the leaky faucet stops dripping. The leak should stop.
Once you have determined which faucet handle/valve is leaking, make sure both supply line valves are OFF.
Then turn both faucet handles to the ON position to make sure that the faucet no longer has water supplied to it.
| Next remove the cap cover associated with the leaking handle, from the top of the faucet handle. Use your common screwdriver to help remove the cap. After removing the cap a Philips screw should be exposed.
Use your Philips screwdriver too remove the screw. This screw holds the faucet handle to the faucet valve stem. After removing this screw and faucet handle, use your channel lock pliers (or a wrench) to unscrew the nut that secures the faucet valve stem to the faucet. |
|
Next, use your needle nose pliers to pull the valve stem out of the faucet. You may also need to use your common screwdriver to help lift it out.
After removing the faucet valve assembly, look for a rubber washer sitting on top of a small spring in the valve stem housing located in the faucet. Use a pair of needle nose pliers to pull the rubber washer and spring out of the valve stem housing. Commonly it is this rubber washer/spring assembly that gets worn out and is what cusses the leaky faucet.
If there is no rubber washer assembly as part of the valve assembly the entire valve assembly will have to be replaced.
Visit your local home improvement center while toting along the old washer/spring assembly and the valve stem, and find a replacement for either the washer/spring assembly or the entire valve assembly if there was no washer/spring assembly in the faucet.
For information on installing a shower pan membrane liner for a ceramic tile shower, see the Shower Pan Membrane Liner Installation eBook from HomeAdditionPlus.com. The Shower Pan Membrane Liner EBook will quickly teach you the step-by-step process for installing the shower pan membrane liner correctly. It includes instructions on framing the shower stall, pouring the pre-slope and shower base mortar, and installing the shower pan membrane liner.
For information on how to tile a custom ceramic tile shower, see the “How to Tile a Custom Ceramic Tile Shower eBook” from HomeAdditionPlus.com. This eBook will quickly provide you with step-by-step instructions on how to measure and install ceramic tile in a shower, including the installation of tile on shower walls, floors and curbs. It provides detailed instructions for every step in the process of tiling a custom ceramic tile shower and is loaded with instructional pictures!
Related Information
- How to Install a Handheld Showerhead Unit Video
- How to Install a Toilet
- How to Replace a Leaky Bathtub Faucet Valve Stem
Additional Plumbing Resources from Amazon.com
 |
 |
Get Free Bathroom Remodeling Price Quotes with No Obligation!
Fill out our 3-5 minute quick and easy form, and receive a free price quote on a bathroom remodeling project from one of our pre-screened and licensed bathroom remodeling contractors. This process is free and there is no obligation to continue once you receive your bathroom addition price estimate.