Follow these Instructions for Unclogging a Sink Drain and Avoiding the Cost of a Plumber
By Mark J. Donovan
|
|
Having to clear a clogged sink is inevitable if you are a homeowner. Fortunately, however, clearing a clogged sink is straight forward to do, albeit it’s a little messy and awkward.
The first step in clearing a clogged sink is to first look under the sink, and see what type of drain plumbing exists. You should see either a PVC or metal J-trap length of tubing. The J-Trap is basically a 180o bend in the tubing that creates a water seal between the sink drain and the rest of the drain system in the house. Next remove the drain stopper. Normally you can remove the drain stopper by turning it left or right 90o and lifting up. |
To aid in removing the drain stopper you may also need to disconnect the pivot rod that sits behind the drain tail pipe underneath the sink.
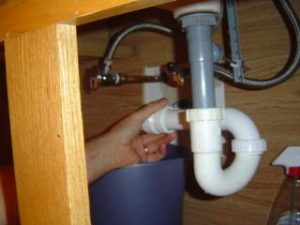
| J-Trap with Couplings
If the J –Trap has couplings that you can unscrew, use your hand or a pair of channel pliers to remove the couplings. Make sure, however, you first place a bucket underneath the J-Trap to catch the standing water in the J-trap. Once you have removed the couplings, simply slide the J-trap down off the sink drain sleeve and away from the remaining portion of the house drain system. |
 |
Pour the contents of the J-Trap into the bucket and remove any large solid/semi-solid clogs from the J-Trap. A pair of gloves may be helpful during this task.
Next, use a rag or bottle washer brush to thoroughly clean out the J-Trap.
In the event you did not find a clog in the J-Trap, first look down through the drain and see if the drain tail pipe is clear. If it is not use a hand auger to remove the clog in the drain tail pipe. If there is no clog in the drain tail pipe and the J-Trap, this probably means the clog is further into the drain system. If this is the case you will want to use the hand auger again and push it further into the drain system. As you push it in, feel for resistance. Once you have passed any resistance screw the hand auger and pull back towards you to remove the clog.
Finally, reinsert the J-Trap into position and reconnect the couplings. With the couplings tightened your clogged sink is a thing of the past.
| J-Trap with Clean-Out Plug
Some J-Traps may not have couplings. This is particularly true with older plumbing systems. In this case there is typically a Clean-Out Plug at the base of the J-Trap. Using a pair of channel lock pliers loosen the Clean-Out Plug nut. Once loose, position a bucket underneath the J-Trap and remove by hand the Clean-Out Plug. Clear the clog via access the Clean-Out Hole. Again, gloves work great during this task. Frequently the clog is a mass of hair. A small screw driver may help in this case to enable you to reach in and clear the clog. |
 |
Again, if the clog persists after cleaning out the J-trap, repeat with the hand auger as described earlier.
J-Trap without Couplings or Clean-out Plug
In this case use the hand auger and insert it into the sink drain to remove the sink clog.
| Insert the auger into the sink drain until you feel the auger pass the obstructed area. Then simply screw the auger and pull back on it to remove the sink clog.
Using a Plunger to Clear a Clogged Sink A plunger should be your last resort as it effectively just pushes the clog further into the system. The hope is that the clog will be pushed into a wider portion of the drain system and then simply be flushed away. Sometimes, however you just push the clog further into the narrow portion of the drain system and make it more difficult to remove with a hand auger later. |
|
For information on installing a shower pan membrane liner for a ceramic tile shower, see the Shower Pan Membrane Liner Installation eBook from HomeAdditionPlus.com. The Shower Pan Membrane Liner EBook will quickly teach you the step-by-step process for installing the shower pan membrane liner correctly. It includes instructions on framing the shower stall, pouring the pre-slope and shower base mortar, and installing the shower pan membrane liner.
For information on how to tile a custom ceramic tile shower, see the “How to Tile a Custom Ceramic Tile Shower eBook” from HomeAdditionPlus.com. This eBook will quickly provide you with step-by-step instructions on how to measure and install ceramic tile in a shower, including the installation of tile on shower walls, floors and curbs. It provides detailed instructions for every step in the process of tiling a custom ceramic tile shower and is loaded with instructional pictures!
Related Information
Additional Plumbing Resources from Amazon.com
 |
 |
Get Free Bathroom Remodeling Price Quotes with No Obligation!
Fill out our 3-5 minute quick and easy form, and receive a free price quote on a bathroom remodeling project from one of our pre-screened and licensed bathroom remodeling contractors. This process is free and there is no obligation to continue once you receive your bathroom addition price estimate.