Kicking of a Home Remodeling Project Can Cause the Average Homeowner to Take Pause
By Mark J. Donovan
|
|
The first house I ever purchased was an unfinished upstairs gambrel. Suffice it to say it was many years ago. For those who are not familiar with a gambrel house, it has a roof that looks similar to a barn roof.
After living in the home for several months, my wife and I decided it was time to finish the upstairs to create more living space for us, and for our future children. Though I had some previous experience in my teenage years helping my father build a couple of homes and home additions, I had serious trepidations of tackling an entire upstairs home remodeling project myself. |
I had not personally managed a home remodeling project, nor had I directly dealt with subcontractors. In addition, I lacked experience in some of the tasks that I was not going to be able to afford to sub out, e.g. the sheet rocking.
Out of necessity, and lack of budget, I pushed my trepidations aside and began planning my first significant home improvement project. In retrospect, planning was instrumental in making my home improvement project successful.
| The first part of my planning involved developing sketches for how my wife and I wanted to partition the upstairs space. The home was a 26’x36’ gambrel and we wanted to create 3 bedrooms upstairs, along with 1 large bathroom. I used graph paper, a ruler, and a pencil and made meticulous scaled drawings of the floorplan. I included locations for internal walls, and the locations of doors and how they would swing. I also included the location of the tub, toilet and vanity in the bathroom area.
After creating the first set of drawings, my wife and I used masking tape to layout the wall locations in the upstairs area. With the masking tape we were able to better see the physical size and locations of the rooms, doors and landing area. After spending some time studying and walking through the proposed floorplan, I made a few minor tweaks to the drawings and moved onto the next stage of the project. The budget! |
 |
As a young couple, money was tight, so it was our intentions to do as much of the work as possible. In the end we wound up doing everything except install the carpet. The entire project took us about 5 months to complete, albeit working weekends and most evenings.
To cost out the project, it was rather straightforward. All of my costs were going to be material costs. As a result, I visited a couple of home improvement stores and obtained general material costs for lumber, sheetrock, insulation, electric wiring and lighting fixtures, plumbing, paint, tile and flooring. I then calculated how much material I needed for each facet of the project and quickly arrived at a bottoms-up budget.
| Once I confirmed that finishing the upstairs was within our budget, I then traipsed off to the town-building inspector with my drawings and budget, where I received permits for construction. At that time I was able to obtain permits for framing, electrical, and plumbing. Things have changed over the decades. Don’t be surprised if you, as an average homeowner, will not be able to obtain permits for doing your own electric and plumbing.
With permits in place I began the framing process. The framing of the walls was one of the most exciting aspects of the project. Framing goes fast and as a result the rooms begin to take shape quickly. After completing framing, I moved on to the rough electric and plumbing. These tasks require some knowledge and experience, and for most I would recommend subcontracting these tasks out. Fortunately, I had some previous experience in these fields and had an uncle as a licensed electrician to inspect my work, before the building inspector showed up. |
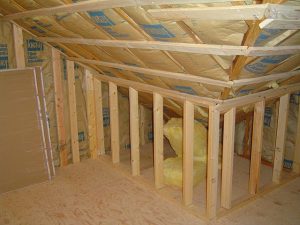 |
Once the rough electric and plumbing were installed, including the tub, I then moved on to the insulation. Fortunately, with this particular unfinished house, most of the outside walls were already insulated, so insulation was minimal.
The next phase of the project, and what I swear I will never do again, is the installation of sheetrock. Sheetrock installation, and the associated taping and mudding that goes along with it, is a heavy and messy job, that quite frankly also requires some artistry. We spent about 2 weeks hanging the sheetrock and another 6 weeks taping and mudding it.
| Taping and mudding really takes either patience, or experience to do a quality job. In our case it was more patience than experience.
With the sheetrock up, taped, mudded, and sanded, we next went to task on texturing the ceiling and painting the walls. During the early 80’s texturing the ceilings were fairly common. We were able to buy cans of textured paint and literally rolled the ceiling. Painting of the walls involved one coat of primer and two coats of paint. |
|
With the painting complete, I then moved on to the door and trim installation. Trim work involved installing baseboard trim and window casement trim. Trim work is a slow process and does take some time to do it right, however, it really begins to complete the process of finishing a room. In our case, we stained the trim prior to installing it, so once it was installed, other than plugging the holes the trim project was complete.
All that remained, besides the installation of the carpet, was completing the finished electric and plumbing. These tasks are pretty exciting as well, as we began to see services, upstairs lighting and a toilet that we could flush.
The final major task was the installation of the carpet. Several weeks before we planned on having it installed, we had a local carpet man come out to the home and measure the rooms and show us some carpet types. As a result of this planning effort, we were able to have the carpet crew come in as soon as we completed our finished electrical and plumbing tasks.
With the carpet installed, we quickly wrapped up the tiling in the bathroom and moved into our new space.
Though we initially had some serious trepidations in starting this home improvement project, the project actually went smoothly, and stayed on schedule and budget. Admittedly, our decision not to use subcontractors helped us maintain our schedule. However, today’s building codes may not afford that opportunity for most. This said, a well thought out floor plan, along with a solid cost estimate and schedule, does goes along way in helping to ensure a home improvement project goes smoothly regardless if you are hiring a contractor or doing it yourself.
Our experience was so positive that three years later we repeated the process on a new home, with one exception. We hired a sheet rocker subcontractor.
For more help on Custom Home building, see HomeAdditionPlus.com’s Home Addition Bid Sheets. The Home Addition Bid Sheets will help ensure that your home building project goes smoothly and is completed on time and budget.
Free Home Addition Price Quotes with No Obligation!
Fill out our 3-5 minute quick and easy form, and receive a free price quote on a house addition from one of our prescreened and licensed home addition contractors. This process is free and there is no obligation to continue once you receive your house addition price estimate.