Installing Furring Strips to Concrete Walls enables Easy Installation of Rigid Foam Insulation and Drywall Panels
By Mark J. Donovan
|
|
Are you thinking about finishing your basement? Do you want to know how to install furring strips for drywall?
If so one of the key items you’ll need to think about is how you plan to attach the drywall panels to the concrete basement framed walls. You basically have two choices. Either build standard 2×4 walls adjacent to the concrete foundation walls and attach the drywall to them, or install furring strips to the concrete basement walls to act as nailing surfaces for fastening the drywall to. |
I suggest the latter. It’s easier to do and you’ll have more finished basement living space when done.
| How to Install Furring Strips for Drywall
For furring strips, use either kiln-dried 2x3s or 2x4s. They should be attached to the concrete walls on their flat side. For furring strips, use either kiln-dried 2x3s or 2x4s. They should be attached to the concrete walls on their flat side. |
See this short video on how to attach furring strips to concrete basement walls. |
This way they provide enough depth to allow for rigid foam insulation and electrical wires to be installed in-between them.
See more on how to insulate a basement with rigid foam insulation here.
Also, by laying them on their flat side up against the concrete basement walls, the amount of encroachment into the to-be finished living space is minimized. Moreover, the 1-1/2 inch of furring wood thickness is sufficient for fastening the drywall to using 1-1/4 inch drywall screws.
| When installing furring strips to concrete basement walls start by fastening a horizontally placed pressure treated 2×4 (sole plate) at the base of the concrete basement wall.
This horizontal pressure treated piece of lumber will act as a moisture barrier between the basement floor and the kiln dried vertical furring strips. See more on framing basement walls. |
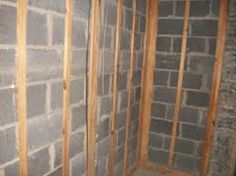 |
Then install kiln dried 2×3 or 2×4 vertical furring strips on top of the horizontal sole plate. The vertical furring strips should run the height of the wall and be spaced on 16 inch centers, starting from one end of the concrete basement wall.
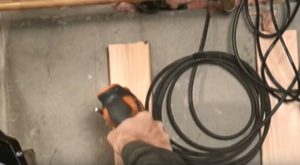
To fasten furring strips to concrete basement walls use Liquid Nails adhesive and three inch fluted concrete nails. Make sure to use a Liquid Nails adhesive that is meant to bond wood to concrete. Run a thick bead of Liquid Nails adhesive along the entire length (flat side) of each vertical furring strip and the sole plate just before positioning each in place for nailing.
| To nail each furring strip in place first use a drill and a masonry bit to drill pilot holes into the furring strips and into the concrete basement wall.
The pilot holes should be located approximately every 16 inches along the length of the furring strips and penetrate into the concrete wall about 1-1/2 inches. Once you’ve drilled a single pilot hole into a furring strip pound a three inch fluted concrete nail into the hole using a small sledge hammer. |

Use this Basement Remodeling Checklist to save money, time and hassles. |
Continue to drill pilot holes and pound in nails along the entire length of the furring strip. Again, the nails should be placed every 16 inches along the length of each furring strip.
Fasten the sole plate, as just described, to the concrete basement wall first. Then fasten the vertical furring strips to it.
|
|
Make sure that each vertical furring strip is straight and space properly before nailing it into place. To aid in holding the vertical member in place while drilling pilot holes and hammering in the concrete nails, toe-nail the bottom of the vertical furring strips into the top of the pressure treated sole plate. Use a powder actuated gun for fastening sole plates to concrete basement floors. |
After 24 hours the Liquid Nails adhesive will have set up and the furring strips should be tightly fastened to the concrete basement walls.
At this point run your electrical wiring and fill the furring strip stud bays with rigid foam insulation to make the finished basement warmer feeling.
To hold the rigid foam insulation in place after cutting each panel to size, apply Liquid Nails adhesive to the side of it that will lie up against the wall.
Then position the rigid foam insulation panel into place in-between the stud bays.
Once the insulation is in place you can now fasten your drywall panels to the furring strips.
For more help on building a home addition, see HomeAdditionPlus.com’s Home Addition Bid Sheets. Our Home Addition Bid Sheets provide you with the knowledge and information on how to plan a home building project, and what to look for when hiring contractors. They also include detailed cost breakdown tables and spreadsheets for estimating your own new home construction building costs.

Related Information
- How to Make Consistent Repetitive Saw Cuts
- How to Attached Frame Walls to Concrete Basement Floor
- Standard Stud Spacing for Framed Walls
Additional Framing Resources from Amazon.com
 |
 |
Free Home Addition Price Quotes with No Obligation!
Fill out our 3-5 minute quick and easy form, and receive a free price quote on a house addition from one of our prescreened and licensed home addition contractors. This process is free and there is no obligation to continue once you receive your home addition price estimate.