How to Use a Nail Set when Installing Trim and Crown Moulding
By Mark J. Donovan
|
|
When installing baseboard trim or crown moulding, and using a hammer and finish nails, it is necessary to countersink the finish nails below the surface of the wood. To do this a hammer and nail set are used. A nail set helps to prevent the area around the finished nail from becoming bruised or damaged from the head of the hammer.
A nail set is a steel nail punch that is about 3 to 4 inches in length and has a tapered end for striking finish nail heads. The nail set shaft has a rough, cross-hatched pattern on its surface to aid in holding it when sinking nail heads. The backend of the nail set has a large flat surface for striking with a hammer. |
Nail sets are available in a variety of sizes. The most common head diameters are 1/32”, 2/32”, and 3/32”. Make sure you use a nail set head diameter that is appropriate for the particular finished nail head diameter. The general concept when selecting a nail set is to use one that will not enlarge the nail hole wider than the diameter of the finished nail.
 |
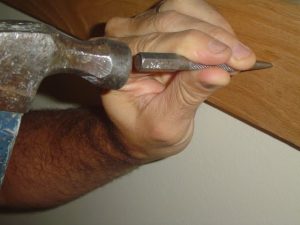 |
Using a Nail Set
When nailing finish trim work, hammer the finish nail into the wood until just the head of the nail is exposed above the surface of the wood.
Next, place the tapered point of the nail set on top of the finish nail head. Notice that the finished nail head has a dimple on it to help in positioning the nail set.
| While holding the nail set onto the finished nail head, strike the backside of the nail set with your hammer to drive the nail below the surface of the wood. Ideally the nail head should be sunk approximately 1/8th inch below the surface of the wood.
Take care when using a nail set to hold it perfectly straight onto the nail head surface. Also make clean, swift hammer strikes so that only one or two are required to sink the nail. |
 |
If you tap the hammer on the nail set many times, the nail set may walk off the surface of the nail set and damage the nail entrance area around the wood.
Dress Up Your Home with Crown Molding – For specific instructions on installing crown molding see the “Installing Crown Molding Ebook“. The “Installing Crown Molding Ebook” will show you how to properly measure, select, cut and install crown molding like a professional carpenter. It provides detailed instructions on every step in the process of installing crown molding and includes 28 instructional pictures! Order and Immediately Download today!. 100% Money-Back Guarantee if you are not satisfied.
For information on installing Window and Door trim see HomeAdditionPlus.com’s Installing Interior Window Trim Ebook and Installing Interior Door Trim Ebook. These Ebooks are loaded with pictures and provide easy to understand, step-by-step instructions, on how to install interior window and door trim.
Related Information
Additional Finish Carpentry Resources from Amazon.com
 |
 |
Free Home Addition Price Quotes with No Obligation!
Fill out our 3-5 minute quick and easy form, and receive a free price quote on a house addition from one of our prescreened and licensed home addition contractors. This process is free and there is no obligation to continue once you receive your house addition price estimate.