Debugging Electrical Light Switch Wiring for New Ceiling Fan Installation
By Mark J. Donovan
|
|
QUESTION: Mark, I’m getting ready to install a ceiling light and I want to run power off an existing light switch. The dilemma I have is I am not sure the cable in my attic is supplying power to the light switch or actually coming from the switch. Do you have any advice on figuring out the electrical wiring of a light switch?
ANSWER: AD, figuring out the electrical wiring of a light switch is similar to piecing together a puzzle. This said, I would first suggest tracing the electrical cable in your attic to see where it goes. If one end is dropping down into a wall that is in the general area of where the main circuit panel is below, then chances are it is a power feed from the panel. |
Next, check the other end of the electrical cable to see where it drops down. If it appears to be dropping down into a wall bay area that is in line with the switch, then chances are this is the feed cable to the switch.
If on the other hand one end of the attic cable appears to drop down into a wall bay area that is in line with the switch and the other end drops down into a wall bay area that is associated with a switched outlet or light(s) already associated with the switch, then chances are this is a control feed from the switch that supplies power to the switched outlet and/or other lights.
Once you have a reasonable opinion of what the attic electrical cable is doing you can confirm your assessment at the switch and outlet boxes. However, extreme caution has to be exercised when doing this. Electricity can kill so use the right tools and shut off power at the main circuit panel whenever working in an electrical box.
| Figuring Out Electrical Wiring of Light Switch
To confirm your assessment start by removing the switch cover plate. With the switch in the off position, use a multimeter to carefully determine what side of the switch is powered and un-powered. While holding the multimeter leads between Ground and the powered side of the switch, have someone turn off power to the switch at the main circuit breaker box and confirm that the multimeter shows a loss of power to the switch. For safety, check both sides of the switch. Then flip the switch to the on position and check again to make sure power is indeed off. |
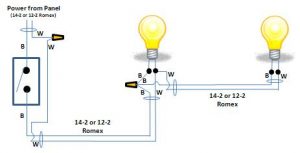
Two Lights Operated off One Switch |
Next, with the power still shut off to the switch and controlled lights and outlet, remove the switch from the box and disconnect the cables. Separate the power feed cable from the switch controlled cable. Also make sure all the wires associated with each cable do not touch each other.
Now go over to the closest outlet or light (relative to the switch) and check for voltage across the two contacts, or three contacts if there is a ground contact. You should not see any voltage. If the switch is feeding a light you will need to remove the light to expose the wires. Again, you should not see any voltage.
Next, go back to the switch and twist together the black and white wires associated with the cable that feeds the outlets and switch.
| Now set the multimeter for an Ohm reading. Again, go back to the outlet or light electrical box and see if you measure a short circuit between the two main contacts associated with the outlet. You should, as you twisted the black and white wires back at the switch. Go back and untwist the wires and then recheck the outlet or light fixture to confirm that the short has been removed.
Once you have figured out the electrical wiring of the light switch, label each of the cables in the switch box with a marker and tape. Wiring Ceiling Light Fixture To wire up the new ceiling light on the switched circuit, run a new cable between one of the other existing outlets and the new ceiling light electrical box. |
 |
Make sure you use the same gauge cable wire for the new electrical box. Tie the corresponding black and white wires together in the existing outlet or light box. Also tie the bare copper ground wires together. Finally, attach the black wire at the new electrical box to the black wire on the ceiling light. Then attach the white wire at the new electrical box to the white wire on the ceiling light. Finally connect the light fixture ground to the ground wire and fasten the ceiling light to the electrical box.
Turn power back on to the switch at the main circuit and test the switch and new light fixture.
For help on building a new custom home, see HomeAdditionPlus.com’s New Home Construction Bid Sheet. The New Home Construction Bid Sheet provides you with the knowledge on how to plan a custom home building project, and what to look for when hiring contractors for your new home construction. It also includes a detailed cost breakdown table and spreadsheet for estimating your own new home construction building costs.
Related Information
- 3-Way Light Switch Wiring Video
- Key Thinks to Remember with Dimmer Switches
- How to Change a Pull Chain Light Switch Lampholder Video
Additional Electrical Wiring Resources from Amazon.com
 |
 |
Free Home Addition Price Quotes with No Obligation!
Fill out our 3-5 minute quick and easy form, and receive a free price quote on a house addition from one of our prescreened and licensed home addition contractors. This process is free and there is no obligation to continue once you receive your house addition price estimate.