How to Restore a Wooden Door to its Original Beauty
By Mark J. Donovan
|
|
A solid wood door is expensive to replace, regardless of whether or not it’s an exterior or interior solid wooden door. Consequently wood door restoration is an excellent alternative to buying a new replacement door for the do it yourself homeowner who’s on a limited budget.
I recently went through a wood door restoration project on a solid 6 panel pine interior door. It was a bathroom door that sat relatively close to a shower stall. Over the years splashed shower water pitted the inside surface of the stained and polyurethaned door. It looked spotted and bleached out from all of the moisture that had effectively eaten away at the door’s polyurethane surface. |
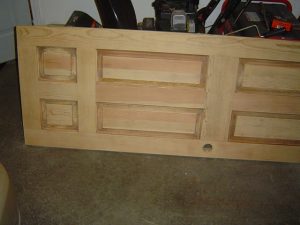
Sanding Old Wooden Door
After taking the door off its hinges I brought it into my garage workshop and removed all of its hardware, including the hinge leafs and the door knob. I then placed it down flat on a couple of cloth covered saw horses, and pulled out my dust mask.
 |
 |
To remove the old polyurethane and stain, I used an orbital sander with 60 grit sandpaper. I proceeded to sand down all of the flat surfaces of the door including the rails, stiles, and raised panels. I sanded the door down to bare wood.
Next, I hand sanded all of the corners and recessed raised panel edges using 60 grit sandpaper. Attempting to use an orbital sander in these areas would have been impossible and would have damaged the raised panels.
I then went back to my orbital sander and used 120 grit sandpaper on the door’s flat surfaces to create a smooth finish. Likewise, I also went back and hand sanded the corners and recessed raised panel edges of the door with 120 grit sandpaper to complete the sanding process.
| Staining the Wood Door
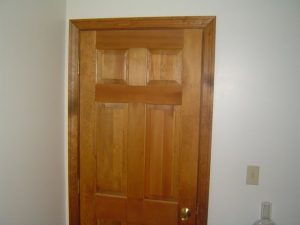
After wiping down the door thoroughly to remove any dust, I used a sponge brush to apply a Minwax pre-stain conditioner solution to the door surface. After letting the pre-stain soak in for about 10 minutes I wiped the excess solution off of the door with a rag. The pre-stain solution helps to ensure an even penetration of the stain into the wood surface. After wiping down the door of any excess pre-stain conditioner, I then used a sponge brush to apply a Minwax stain to the door surface. Immediately after staining the door I wiped it down with a clean and dry rag. |
 |
Polyurethane Wood Door
Over the next two subsequent days I applied two coats of polyurethane to the wood door. In between the coats of polyurethane I lightly wiped down the door surface with very fine steel wool. Lightly wiping the door down with steel wool helps to ensure a very smooth finish on the final coat of polyurethane.
Finally, I reinstalled the door hardware and reattached the door to the door frame to complete my door restoration project.
So before throwing out your old wood door, evaluate it for functionality and hidden beauty. If it still has both attributes, consider restoring it rather than taking it to the dump and buying a replacement door. Buying a replacement door will cost you more and will require nearly the same amount of work as restoring the old one. Though you won’t have to sand the new door, you’ll still need to stain and polyurethane it, or paint it. In addition, you’ll end up also having to either replace the old doorframe, or mortise out the hinge areas of the new door with a chisel.
For information on how to install interior door trim, see the “Installing Interior Door Trim” eBook from HomeAdditionPlus.com. The “Installing Interior Door Trim” eBook provides step-by-step instructions on how to install interior door trim. Pictures are included for every key step in the process.
Related Information
Additional Door Resources from Amazon.com
 |
 |
Free Home Addition Price Quotes with No Obligation!
Fill out our 3-5 minute quick and easy form, and receive a free price quote on a house addition from one of our prescreened and licensed home addition contractors. This process is free and there is no obligation to continue once you receive your house addition price estimate.