Step-by-Step Instructions for Changing out a Garage Door Torsion Spring Properly and Safely
By Mark J. Donovan
|
|
Right up front I want to be clear that replacing a garage door torsion spring can be dangerous, so think twice before choosing to do this type of project on your own.
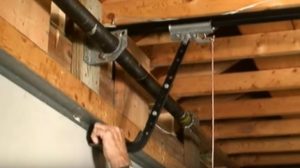
Prior to actually doing any work on your garage door inspect it carefully. Look to see if you can find the source of the problem that may have led to the torsion spring’s failure. Make sure to confirm that the torsion springs mounting brackets and track hangers are secure. A failed or loosened bracket can often be the root cause of a torsion spring failure. Also, make sure any loose brackets are securely refastened prior to actually replacing the garage door torsion spring. |
Finally, make sure that the torsion spring is not under any residual tension before you begin to disassemble it. If there is tension, you could end up seriously injuring yourself or damaging items in the garage.
| If your garage door has only one torsion spring follow the instructional tips on how to replace it.
1) First, remove the stationary cone from the torsion spring center support and slide it over towards the drum. 2) Next, make a mental note of the position of the torsion spring’s end bearing plate and then unbolt the plate and slide it off the shaft. 3) Now, loosen the drum screws and slip the drum off of the shaft. 4) Next, slip the broken spring off of the shaft and slide the new one on. |
 |
5) Then slide the drum and end bearing plate back onto the shaft. Make sure to position the end bearing plate at the same location it was originally located.
6) Now fasten the spring to the center support plate.
| 7) Next, check the opposite drum and make sure that the screws associated with it are tight and that the wire cable is wrapped around the drum properly. Use Vise-Grips to hold the shaft in place to prevent the drum from rotating and the cable from becoming loose.
8) Then on the loose drum side, reconnect the wire cable and turn the drum so that the cable wraps snuggly around the drum. Then tighten the drum set screws. 9) Make sure that both wire cables are of equal tension. If they aren’t adjust so that they are. |
 |
10) Next, wind the torsion spring using a couple of steel rods that fit tightly into the winding plug holes. Make sure to wind the torsion spring per the manufacturer’s directions.
If your garage door has two torsion springs that share the center support, you will have to remove the tension completely from the spring that was not broken before undertaking the replacement of the damaged garage door torsion spring.
For more information on building a garage addition see the Garage Addition Bid Sheet from HomeAdditionPlus.com. The Garage Addition Bid Sheet includes an extensive questionnaire (Request for Quote) that a homeowner can provide to prospective general contractors and subcontractors for bidding the garage addition. In addition, the Garage Addition Bid Sheet also includes estimated costs and time intervals for constructing a garage addition as well as a list of key home material manufacturers. Finally, the Garage Addition Bid sheet includes an extensive set of helpful tips and advice on making sure the garage addition is built properly and on time and budget.
Related Information
- A Guide to Garage Door Openers
- How to Install a Garage Door Opener Video
- Tips on Buying the Right Garage Door Opener
Free Garage Addition Price Quotes with No Obligation!
Fill out our 3-5 minute quick and easy form, and receive a free price quote on a garage addition from one of our prescreened and licensed garage addition contractors. This process is free and there is no obligation to continue once you receive your garage addition price estimate.