How to Steps for Fixing a Sticky Interior Door
By Mark J. Donovan
|
|
A sticky interior door is usually attributable to either a door hinge becoming loose, or the door swelling due to high moisture or humidity levels within the home. How to repair a sticky interior door dramatically differs pending on which is the culprit associated with your sticky interior door.
Tools Required for Repairing a Sticky Interior Door
|
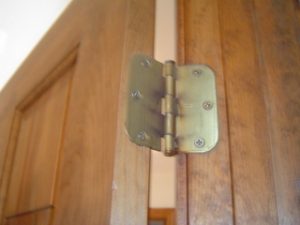
The first thing to inspect when experiencing a sticky interior door is the door hinges. Make sure all of the hinges are tightly fastened to the door jamb and the door itself. Due to some basic laws of physics and leverage, the upper most hinges along the door jamb are more likely to become loose over time, so inspect these first. As the hinge becomes loose and separates from the door jamb, the door leans out, if you will. Consequently the far end of the door winds up rubbing up against the far side of door jamb, which causes the stickiness.
| Tighten Screws in Door Hinges
Use a screw driver or a screw gun to make sure all of the screws are tightly secured to the door jamb. If in the process of tightening the screws you determine that one or more of the screws are stripped you can do one of two things. First try to use longer screws in place of the original shorter ones. If the longer screws do not securely fasten the hinge to the door jamb, you will then need to go to Plan B. |
 |
Plan B involves the use of ½” or 3/8” dowels. When using dowels, first open the door widely and remove the screws from the section of hinge. Swing the hinge away from the stripped out screw holes so that the stripped out screw holes are visible.
Next, using a ½” or 3/8” drill bit, drill out the stripped out screw holes, approximately 1” in depth. Then, with carpenters glue applied to approximately 1” of dowel, slide the dowel into the hole you just drilled. Let the dowel and glue set up for 24 hours.
With the dowel now firmly setup and sanded flush with the door jamb, position the hinge back over the door jamb and make a small pilot-hole mark.
Again, slide the door hinge out of the way and then drill a small pilot hole into the dowel, where you made the small pilot-hole mark.
After the pilot-hole has been drilled refasten the hinge using the original screws.
If the door hinges are all properly secured the space between the door jamb and the door, on the hinge side, should be approximately 1/8th of an inch the entire height of the door.
| Trimming a Sticky Interior Door
If the interior door still sticks, then your door may have swelled due to the absorption of moisture. If this is the case, you will then need to remove the door and trim the opposite hinge side of the door. Before removing the door, attempt to close the door and see where the door is touching the door jamb. Use a pencil and run a mark along the length of the door where the door is touching the door jamb. |
 |
Next, remove the door from its hinges by pulling out the hinge pins.
Lay the door on a set of horses or other flat work area.
Using a long straight edge, run a straight line along the length of the edge of the door such that it is consistent with the marks you made earlier on the door.
Also, while still holding the straight edge, score the line with a carpenter’s knife. This will help aid in preventing chips in the door when cutting with your circular saw.
If the section of door material to be removed is 1/8th inch or less, use a hand plane to remove the offending wood.
If greater than 1/8th of an inch then you will need to use your circular saw.
Using a couple of C clamps, and a few of shims for protecting the door from the clamps, fasten your long straight edge to the door so that it can be used as a fence for the circular saw. Position the long straight edge board so that your saw will slide along side of it and cut on the line that you previously made.
After cutting the door, lightly sand it.
Re-install the door onto its hinges, and check to see if the door swings freely closed.
Once you have determined the interior door is no longer sticking, remove the door again, and apply one coat of stain/paint to the trimmed edge.
With the door reinstalled, your sticky interior door is now a thing of the past.
For information on how to install interior door trim, see the “Installing Interior Door Trim” eBook from HomeAdditionPlus.com. The “Installing Interior Door Trim” eBook provides step-by-step instructions on how to install interior door trim. Pictures are included for every key step in the process.
Related Information
Additional Door Resources from Amazon.com
 |
 |
Free Home Addition Price Quotes with No Obligation!
Fill out our 3-5 minute quick and easy form, and receive a free price quote on a house addition from one of our prescreened and licensed home addition contractors. This process is free and there is no obligation to continue once you receive your house addition price estimate.