Step by Step Instructions for Installing a Bathroom Cabinet
By Mark J. Donovan
|
|
To install a bathroom cabinet you’ll need a level, screw gun, drill bits, jigsaw, tape measure, and possibly a compass and table saw (or skill saw). The compass and saw are necessary if you have to scribe the side of the vanity for ensuring a flush fit with an abutting side wall. You’ll also need a few wood shims.
First and foremost when installing a bathroom cabinet it is imperative that it is level and sits flush up against the bathroom wall(s). However, before installing the bathroom cabinet you’ll need to cut out a large opening in the back of it, assuming it does have a back, to allow the plumbing pipes protruding from the wall to penetrate into the cabinet area. |
Mark the area to cut out on the back of the bathroom cabinet and then drill a few large pilot holes using a drill bit and your screw gun. Then use your jigsaw to cut out the marked area.
| Next, slide the bathroom cabinet into position and place a level across the top of it. Make sure to place the level front to back and then side to side to ensure that it is level in both directions. If it is not level, slide a shim or two underneath the appropriate bottom side of the cabinet to make it level.
Once the bathroom cabinet is level, confirm that it sits flush and squarely up against the wall. If the cabinet is only butting up to a back wall then you can live with a gap of up to 1/8 inch. |
 |
The bathroom vanity countertop will hide the gap, and you can use a small piece of quarter round trim on the sides of the vanity to hide any gaps if necessary.
If the bathroom cabinet butts up to a back and side wall, confirm that the cabinet sits squarely in the corner. If it does not, you may need to scribe and cut out a strip of the side cabinet material to eliminate any gap on the front side of the cabinet.
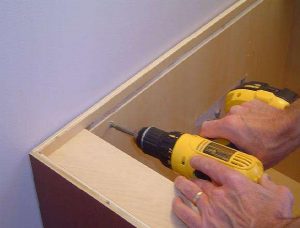
| Use your compass to trace and mark the contour of the side wall along the abutting edge of the cabinet. Then use a skill saw to make the cut. If you’re using a filler board to fill the gap between the bathroom cabinet and the wall, scribe the filler board and cut it on a table saw. The filler board is the best solution for getting a clean look. If you do use a filler board, after cutting it secure it to the side of the bathroom cabinet with screws and then slide the cabinet back into place. With any luck it should fit like a glove up against the side wall.Once you have the bathroom cabinet positioned into place, and have confirmed that it is still level, secure it to the wall using 1-1/2 to 2 inch screws. Make sure, however, that the screws penetrate into wall studs. Also make sure that you don’t inadvertently hit a pipe when screwing the bathroom cabinet to the wall. |
 |
After you complete the bathroom cabinet installation you can then continue on and mount the bathroom vanity countertop to the cabinet.
For help on your bathroom remodeling project, see my Bathroom Remodeling Bid Sheet. The Bathroom Remodeling Bid Sheet provides a request for quote checklist section that you can provide to prospective bathroom remodeling contractors. It also includes a comprehensive bathroom remodeling cost breakdown table, in Microsoft Excel format, that allows the contractor to include his projected remodeling costs for every phase of the project.
Related Information
Additional Bathroom Remodeling Design Resources
 |
 |
Get Free Bathroom Remodeling Price Quotes with No Obligation!
Fill out our 3-5 minute quick and easy form, and receive a free price quote on bathroom remodeling from one of our prescreened and licensed bathroom remodeling contractors. This process is free and there is no obligation to continue once you receive your bathroom renovation price estimate.