Detailed Instructions on How to Install a Mailbox Post
By Mark J. Donovan
|
|
Over the years I have had to install several new 4×4 mailbox posts. Initially I tried just digging a hole, sliding it in, backfilling it with loose dirt and eyeballing it for straightness.
In recent years I have learned a few techniques for increasing the longevity of the mailbox post and increasing its aesthetic charm. Below are instructions for installing a mailbox post the right way. First go to your local Home Improvement store and purchase a pre-fabricated pressure-treated 4×4 Mailbox post to your liking. |
Also pick up an 80lb bag of Sakrete concrete and a 2.5gallon bucket. Next find two stakes about 1.5’ long and two 1”x3” boards about 6’ long. A screw gun and level will also be required. Also locate about a dozen hand size stones.
| Once you have identified the location for your mailbox, dig a hole sufficient enough for the 2.5 gallon bucket to sit in comfortably. The bucket should sit approximately 4 inches below the finished grade of the surrounding area.
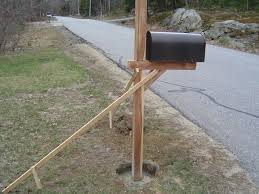
Now place and center the post in the bucket. Place the stones around the post. This will help to roughly stabilize the post. Then screw one of the ends of the 6 foot long 1x3s to the mailbox post, approximately 3 feet from the base. |
 |
Repeat this process with the second 1×3 board, however place this board 90 degrees opposite the other.
The boards should lead out to the ground. Adjust the boards so that the mailbox post is perfectly vertical. Use the level to confirm that it is. Make sure you put the level on multiple sides of the post to confirm that it is indeed level.
| Next pound one of the stakes into the ground about 8 inches from the end of one of the boards. Raise the board up a couple of inches (while keeping the post level) and screw it to the stake. Repeat the process with the other stake and board.
Next empty the contents of the Sacrete concrete into a wheelbarrow. Add about a gallon of water to start and mix thoroughly. Add water as needed until the mixture has the consistency of a thick cake batter. After this is completed poor the mix into the bucket. Fill it right up to the top. Then let the concrete sit up over night. |
 |
Once the concrete is hard, back fill the area with topsoil, covering the bucket. Then remove the boards and stakes and apply some grass-seed to the disturbed area. All that is left is to mount the Mailbox to the top of the post and you are in business.
Dress Up Your Home’s Exterior with an Arbor – If you’ve always wondered what to do about a side door entrance to your house or garage to make it more appealing, or just wanted to simply spice up the backyard, building an arbor may be your answer. The “How to Build an Arbor Ebook” provides detailed, step-by-step instructions and pictures on how to build an entrance-way arbor for your home. Order and Immediately Download today!. 100% Money-Back Guarantee if you are not satisfied.
Planning to have a Brick or Paver Walkway Installed by a Landscaping Contractor but not sure what questions to ask to ensure you hire the right one? See HomeAdditionPlus.com’s Brick and Paver Walkway Bid Sheet. The Brick and Paver Walkway Bid Sheet will help ensure that your walkway project goes smoothly and you get the finished walkway you are looking for.
- Copper Mailboxes Provide Unique Beauty and Charm
- How to Install a Mailbox and Mailbox Post Video
- Heavy Duty Mailboxes
Additional Landscaping Resources from Amazon.com
 |
 |
Free Home Addition Price Quotes with No Obligation!
Fill out our 3-5 minute quick and easy form, and receive a free price quote on a house addition from one of our prescreened and licensed home addition contractors. This process is free and there is no obligation to continue once you receive your house addition price estimate.