Remove Ceramic Tile Flooring and Backerboard base as one Unit
By Mark J. Donovan
|
|
Removing ceramic tile flooring is a tough, dirty and potentially dangerous job. However removing ceramic tile flooring on a backerboard base is easier than removing it from a concrete floor.
Required Safety Equipment and Tools The first step in removing ceramic tile flooring is to gather all the necessary tools. However, first and foremost make sure you have the right safety equipment. This includes safety goggles that fully protect your eyes, heavy work gloves, and clothes that fully protect your body from shards of broken ceramic tile and grout. |
Tools required for removing ceramic tile include a hammer, chisel, a long handle floor scraper, pry bar, dremel tool (optional), a stiff 3-4” putty knife, and a shop-vac.
Removing Ceramic Tile Flooring
Make sure you are wearing your eye and body protection before proceeding with the removal of ceramic tile flooring.
When it comes to removing ceramic tile flooring on a backerboard base it is best to remove it all as one unit. Backerboard is inexpensive and it is not worth the time and effort to attempt to save it.
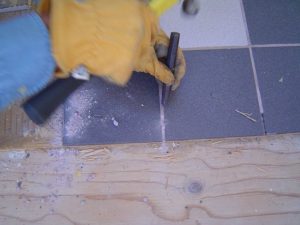
| Removing ceramic tile flooring begins at the edge of the ceramic tile floor area, not the center of it.
At the edge of the ceramic tile floor area begin removing the grout with a hammer and chisel, or a dremel tool if you have one. After removing the grout from around an area of approximately a square foot, or that encompasses a few tiles, whichever is larger, use your hammer and putty knife to lift up from under one of the tiles near the edge of the tiled area. You may optionally need to use a pry bar in lieu of the putty knife. In either case, apply the putty knife or pry bar at a shallow angle and tap it underneath the ceramic tile with your hammer. Then lift up to pop the ceramic tile up. |
 |
Once you have removed a couple of tiles, use your hammer to pulverize the exposed backerboard to create an opening between it and the subfloor.
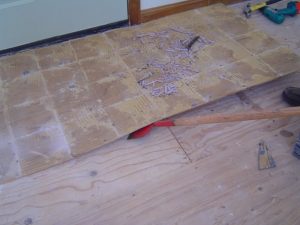
| Next, using your floor scraper, slide it a few inches under the backerboard so that it rests above the subfloor and below the backerboard. Now, while holding the floor scraper at a low angle, push forward and twist upwards. This action should begin to lift the backerboard and ceramic tile up as one unit.
Continue to work the floor scraper underneath the backerboard to remove all of the backerboard and ceramic tile. Once you have removed the backerboard, remove any nails that may still be imbedded in the subfloor. |
 |
Next, use a shop-vac to thoroughly vacuum the area.
Finally repair the subfloor if necessary by patching nail holes, and applying a floor leveling compound if necessary.
For information on installing a shower pan membrane liner for a ceramic tile shower, see the Shower Pan Membrane Liner Installation Ebook from HomeAdditionPlus.com. The Shower Pan Membrane Liner EBook will quickly teach you the step-by-step process for installing the shower pan membrane liner correctly. It includes instructions on framing the shower stall, pouring the pre-slope and shower base mortar, and installing the shower pan membrane liner.
See HomeAdditionPlus.com’s Ceramic Tile Calculator
See my “How to Tile a Custom Ceramic Tile Shower” Ebook to learn how to tile your own shower: For a detailed set of instructions on tiling a shower floor and walls, including pictures for every step in the process, see my “How to Tile Custom Ceramic Tile Shower Ebook”.
Related Information
Additional Ceramic Tile Resources from Amazon.com
 |
 |
 |
Get Free Bathroom Remodeling Price Quotes with No Obligation!
Fill out our 3-5 minute quick and easy form, and receive a free price quote on a bathroom remodeling project from one of our pre-screened and licensed bathroom remodeling contractors. This process is free and there is no obligation to continue once you receive your bathroom addition price estimate.