Cement Backer Board should be used behind Ceramic Tile in Heavily Moist Areas
By Mark J. Donovan
|
|
Installing cement backer board is easy to do, with the exception of lifting and carrying it. Cement backer board is quite heavy so ideally you should plan on having a spare pair of hands nearby when installing it.
Cement backer board is used in ceramic tile installation projects where heavy amounts of moisture are expected. Cement backer board should be installed as a backer board material for ceramic tile shower and tub enclosures, tile or stone kitchen countertops, and tile floor applications. |
Cement Backer Board Alternatives
There are alternatives to cement backer board that are also specifically designed for ceramic tile installation, such as water resistant greenboard, and specialized gypsum core based products where there is a rough fiberglass surface covering a gypsum center. In my opinion, however, I believe these products are not suitable for heavy moisture environments such as a shower unit or kitchen countertop.
As soon as water penetrates the surface of these alternative materials, via a simple wicking action for example, the center gypsum core material will begin to break down. Inevitably this will lead to water leaks and a failed tiled surface.
Cement backer board on the other hand is a cementitious product, as the name suggests, and can literally be submerged in water and it will not break down.
| Cement Backer Board Dimensions
Cement backer board is available in ¼” and ½” thicknesses and is commonly found in 3’x5’ dimensions. I recommend using ½” on shower walls and either ¼” or ½” on kitchen countertops and floor surfaces. Installing Cement Backer Board When installing cement backer board it is important to install it on surfaces that are plumb and flat. Cement backer board is a rigid material that has limited flexibility. |
 |
Consequently it is imperative that wall studding be constructed using quality framing material and techniques. Wall studs, for example should be constructed out of non-twisted lumber and should be located on a maximum of 16 inch centers. In addition, always install a moisture barrier, e.g. 15 lb felt paper or plastic, over the wall studs prior to installing the cement backer board.
| When installing cement backer board always have the rough surface facing the tile when using thin-set mortar and the smooth side facing the tile when using an adhesive. In shower and tub enclosure applications thin-set mortar should be used, and consequently the rough side should be facing the tile.
To fasten the cement backer board to the walls I prefer to use corrosion resistant screws, such as Rock-On screws which are specifically designed as fasteners for cement backer board. Alternatively you can use hot dipped ring shanked nails. Make sure that screws or nails are installed every 6-8 inches along the length of the wall studs. |
Immediately Downloadable |
Also make sure to leave about a 1/8” space between panels when installing them. In addition, leave approximately a ¼” gap between the bottom edge of the cement backer board and the surface of the shower or tub enclosure. If the backer board comes in contact with the shower or tub enclosure, moisture could possibly wick up behind the backer board and onto the wall studs. Rot, mold and mildew could then begin to form.
| After installing cement backer board use a trowel to tape and fill the seams between panels.
Use a 2” wide alkaline resistant fiberglass tape and thinset mortar to fill the seams. By doing this you can smooth out the transition between cement backer board panels that are of uneven heights. Cutting Cement Backer Board When cutting cement backer board you can use a circular skill saw however I do not recommend it, as dust will fly everywhere. Instead use a scoring knife for cutting straight lines and a drill and jigsaw with a carbide tipped blade for making punch-hole cuts. |
 |
When making straight cuts use a scoring knife to score the smooth side of the cement backer board and then stand the board up and apply pressure to the back side of the board (rough side). The board will snap along the scoring line. For punch-hole cuts use the drill to make pilot holes and a jigsaw to cut between the pilot holes.
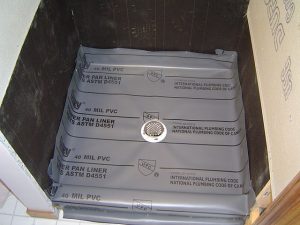
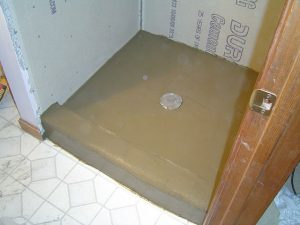
For information on installing a shower pan membrane liner for a ceramic tile shower, see the Shower Pan Membrane Liner Installation Ebook from HomeAdditionPlus.com. The Shower Pan Membrane Liner EBook will quickly teach you the step-by-step process for installing the shower pan membrane liner correctly. It includes instructions on framing the shower stall, pouring the pre-slope and shower base mortar, and installing the shower pan membrane liner.
See HomeAdditionPlus.com’s Ceramic Tile Calculator
See my “How to Tile a Custom Ceramic Tile Shower” Ebook to learn how to tile your own shower: For a detailed set of instructions on tiling a shower floor and walls, including pictures for every step in the process, see my “How to Tile Custom Ceramic Tile Shower Ebook”.
Related Information
- How to Ceramic Tile a Shower Video
- Shower Mortar Pan Stack-up Video
- How to Remove Backer Board from Walls Video
Additional Ceramic Tile Resources from Amazon.com
 |
 |
 |
Get Free Bathroom Remodeling Price Quotes with No Obligation!
Fill out our 3-5 minute quick and easy form, and receive a free price quote on a bathroom remodeling project from one of our pre-screened and licensed bathroom remodeling contractors. This process is free and there is no obligation to continue once you receive your bathroom addition price estimate.