Make sure to Install a Ceramic Tile Underlayment before Tiling Your Floor
By Mark J. Donovan
|
|
Key to every quality ceramic tile floor installation is a strong ceramic tile underlayment. Ceramic tile is an extremely inflexible and brittle material. Consequently to ensure that the ceramic floor tiles will stand the test of time and won’t crack or become loose under load, it is imperative to install a solid ceramic tile underlayment. I have seen many failed ceramic tile floors with cracked tiles and loose grout, and in every case you could literally feel the ceramic tile floor flex when you bounced up and down on it.
With a properly installed tile underlayment, there should be nearly zero floor deflection when springing up and down on the floor. |
A ceramic tile underlayment consists of a layer of material that is sandwiched between the wood subfoor and the ceramic tiles. There are a couple of tile underlayments choices to choose from when installing a ceramic tile floor.
| One of the least expensive solutions for a ceramic tile underlayment is to install an additional layer of plywood over the existing wood subfloor. The plywood should be an exterior grade type so that it has some roughness. The roughness helps ensure a better bond with the thinset adhesive and the ceramic tiles. The total thickness of the wood floor, after applying the extra layer of plywood, should be 1-1/4 inch. Most wood subfloors use ¾ inch plywood. As a result, to create a solid ceramic tile underlayment you should use ½ inch exterior grade CDX plywood. | 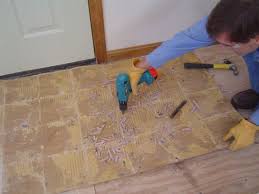 |
Another alternative is to install ½ inch thick cement backerboard on top of the ¾ inch wood subfloor. Cement backerboard, as the name suggests, is a lightweight concrete sheathing product that is constructed out of Portland cement and fiberglass mesh. Besides being an extremely rigid product, it is also moisture resistant. In the trades it is commonly called Wonderboard or Durock.
Whether using plywood or cement backerboard for your ceramic tile underlayment, the joints of the underlayment material should be staggered and line up over floor joists.
Non-corrosive screws should be used to fasten the ceramic tile underlayment to the subfloor and floor joists. Make sure to install screws on 6 to 8 inch centers along the floor joists, as well as between them, to ensure a completely rigid underlayment.
If you plan to install a ceramic tile floor on a concrete slab you do not need to install a plywood or cement backerboard underlayment. Just make sure, however, to fill any cracks or holes in the concrete slab with a self leveling compound before installing the ceramic tile floor. Also, before setting ceramic tile on a concrete slab make sure the surface has been thoroughly cleaned.
For information on installing a shower pan membrane liner for a ceramic tile shower, see the Shower Pan Membrane Liner Installation Ebook from HomeAdditionPlus.com. The Shower Pan Membrane Liner EBook will quickly teach you the step-by-step process for installing the shower pan membrane liner correctly. It includes instructions on framing the shower stall, pouring the pre-slope and shower base mortar, and installing the shower pan membrane liner.
See HomeAdditionPlus.com’s Ceramic Tile Calculator
See my “How to Tile a Custom Ceramic Tile Shower” Ebook to learn how to tile your own shower: For a detailed set of instructions on tiling a shower floor and walls, including pictures for every step in the process, see my “How to Tile Custom Ceramic Tile Shower Ebook”.
Related Information
Additional Ceramic Tile Resources from Amazon.com
 |
 |
 |
Get Free Bathroom Remodeling Price Quotes with No Obligation!
Fill out our 3-5 minute quick and easy form, and receive a free price quote on a bathroom remodeling project from one of our pre-screened and licensed bathroom remodeling contractors. This process is free and there is no obligation to continue once you receive your bathroom addition price estimate.