How to Install Bathroom Tile and Achieve a Professional Job
By Mark J. Donovan
|
|
Tiling your bathroom is a great way to increase its beauty and to make bathroom cleaning and maintenance easier. Bathroom tiling can be accomplished by even a moderately skilled do it yourself homeowner, however key to a professional job is using the right tools. So while you’re out picking the bathroom tile for your tiling project, also make sure you obtain the right tools.
Listed below are the key tools for tiling your bathroom.
|
Site Preparation
Before jumping into your tiling project it is critical to prep the area to be tiled. Whether you’re tiling floors or walls they need to be spotlessly clean and dry, and free from any lumps or voids. If tiling bathroom walls, lightly wash down the walls and fill any holes with joint compound. Similarly, if tiling bathroom floors make sure to install an underlayment and that it is clean, smooth and level. If applying ceramic tiles to a concrete slab, then fill in any voids and make sure the floor is level. You may need to apply a self leveling compound to level out the concrete slab.
| Snapping Chalk Lines
In order to ensure the tiles are installed perfectly straight and square snap perpendicular chalk lines on the floors or walls, depending upon what you’re tiling. Always begin your tiling project at the intersection of the snapped chalk lines and work your way outwards. You may also want to add additional chalk lines for continuous reference points as you tile outwards. Setting Out Tiles Prior to applying thinset adhesive or mortar to the surface area, set out the tiles on the bathroom floor or along the wall to see how the tiles will run the length of it. |
 |
For the most professional bathroom tiling project you’ll want to ensure that at the far ends of the wall or floor that any cut tiles are of the same size. Alternatively, if you want only one far end to have cut tiles, select the wall or floor end that will be less visible.
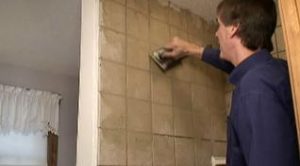
Applying Thinset Adhesive or Mortar
Make sure to use the proper thinset adhesive or mortar as specified by the ceramic tile manufacturer. In addition, mix the thinset adhesive per the recommended instructions. Note that some tile adhesives come already mixed. After the thinset has been mixed and has had time to slake up, use your notched trowel to spread it onto the to-be tiled surface. I typically like to cover about 9 to 12 square feet of area at a time. This way the thinset doesn’t dry out too much before I have a chance to set all of the tiles in that area. Also, the size of the notches in the trowel is predicated on the size of the tiles. The larger the tiles, the larger the trowel notches should be.
| Installing Bathroom Tiles
After applying thinset adhesive to the floor or wall, begin setting the tiles into the thinset. As you set them in place, twist them a little bit to ensure that a good bond is obtained between the tile and the thinset. To ensure you achieve a uniform spacing between tiles use tile spacers or lugs to space the tiles. Tile spacers come in a variety of thicknesses so pick up a couple of bags of them for the desired grout spacing when purchasing your tiles. |
 |
If you’re installing bathroom wall tiles, you may want to use a temporary batten board along the lower wall section (one tile row up from the floor) to help ensure the first row of tiles is installed evenly. You can then use tiles spacers to ensure even tile spacing as you install upper courses of tiles.
Finally, after the wall tiles have been installed and have had time to set up, you can remove the batten board and install the final bottom row of tiles. To keep the bottom row of tiles properly spaced, use tape to hold them in place. The tape can be fastened to the row of tiles just above the row of tiles that you are installing.
Cutting Bathroom Tiles
After placing all of the whole tiles in the area where you applied thinset adhesive make the necessary tile cuts to fill the remaining area. I highly recommend using a tile wet saw to make these cuts as it will speed up the project, reduce tile waste, and achieve a more professional tile job. A tile wet saw can also address most curved cuts as well, negating the need for using tile nippers in most cases. After cutting each tile piece you may want to sand down the cut edge(s) with a tile sand sponge or stone.
Grouting Bathroom Tile
After the tiles have had 24 hours to set up remove the tile spacers and then grout. Use a high quality grout and mix it up per the grout manufacturer’s recommendations. Use a grout float to work the grout into the joints. Go across seam intersections at a 45 degree angle pushing the grout into the joint seams with the grout float.
Make sure to clean the surface of the tiles regularly to remove the excess grout, using clean water and a large sponge. I highly recommend cleaning off the tiles every 9 to 12 square feet of grouted tile area. After grouting all the bathroom tile, immediately go back and wipe down the tiles again with the sponge and a bucket of clean fresh water. Make sure to rinse the sponge frequently. You’ll probably need to repeat this process a few times. Also, on the final pass wipe down the tiles with cheese cloth. The cheese cloth removes any dried residual grout film.
Finally, after the grout has set up for 3 days, apply a grout sealer to the grout seams to prevent mold and mildew growth. Also caulk around all plumbing fixtures to complete the bathroom tiling project.
For information on installing a shower pan membrane liner for a ceramic tile shower, see the Shower Pan Membrane Liner Installation Ebook from HomeAdditionPlus.com. The Shower Pan Membrane Liner EBook will quickly teach you the step-by-step process for installing the shower pan membrane liner correctly. It includes instructions on framing the shower stall, pouring the pre-slope and shower base mortar, and installing the shower pan membrane liner.
See HomeAdditionPlus.com’s Ceramic Tile Calculator
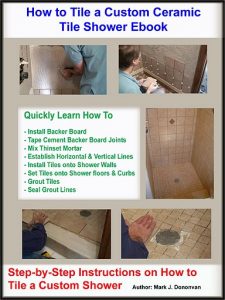
See my “How to Tile a Custom Ceramic Tile Shower” Ebook to learn how to tile your own shower: For a detailed set of instructions on tiling a shower floor and walls, including pictures for every step in the process, see my “How to Tile Custom Ceramic Tile Shower Ebook”.
Related Information
- How to Buy the Right Tile Wet Saw
- Setting Bathroom Floor Tile
- How to Tile a Custom Ceramic Tile Shower Video
Additional Ceramic Tile Resources from Amazon.com
 |
 |
 |
Get Free Bathroom Remodeling Price Quotes with No Obligation!
Fill out our 3-5 minute quick and easy form, and receive a free price quote on a bathroom remodeling project from one of our pre-screened and licensed bathroom remodeling contractors. This process is free and there is no obligation to continue once you receive your bathroom addition price estimate.