How to Extend Garage Shingle Life by Creating a Ridge vent
By Mark J. Donovan
|
|
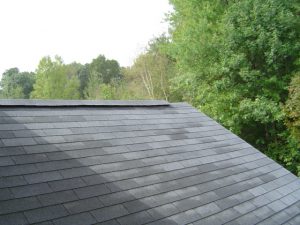
With older homes and attached unfinished garages it is not uncommon to find garage roofs without ridge vents. This is unfortunate as a ridge vent can help keep a garage cooler during summer months regardless if there is a finished room above the garage or not. In addition, a ridge vent can extend the life of roofing shingles by venting the hot garage attic air.
A ridge vent works in concert with soffit vents to circulate air from roof eaves to the roof peak. Cooler air is drawn in from the soffit vents and warm attic air is vented out the top of the roof via the ridge vent. |
Installing a ridge vent is a relatively easy project. To begin with measure the length of your garage roof ridge and go out and purchase the appropriate length of plastic ridge vent. Plastic ridge vent typically comes in 4 foot lengths.
Next remove the shingles that form the ridge cap on the garage roof.
| After removing the ridge cap shingles, lay two lengths of plastic ridge vent along the peak of the roof, approximately 6 inches in from either end of the roof. Make a mark on the roof shingles on each side of the ridge vent. Do this on both ends of the roof peak.
Next, snap chalk lines between the far end marks on each side of the roof peak. The chalk lines will act as guide marks for installing the ridge vent. Without chalk lines it is very easy to have the ridge vent wander along the roof ridge when installing it, thus creating a less than professional roofing look. |
 |
Next, you need to create an air gap on the top of the garage roof ridge to let attic air escape. To do this snap another pair of chalk lines on either side of the roof peak, approximately 1 inch down from the roof peak. Then use a circular skill saw to cut along these two chalk lines. Make sure, however, to set the saw blade depth to no deeper than the thickness of the roof sheathing. Roof sheathing is typically ½” to 5/8” thick. Also make sure that the ridge vent does not extend any closer than 6 inches from either end of the roof peak edge. After you have made the cuts remove the strips of roof sheathing to expose the air gap.
| Once you have created the air gap on the garage roof peak you can begin to install the plastic ridge vent. Start at one end of the newly created roof peak opening and begin fastening the plastic ridge vent to the garage roof peak. Use the remaining chalk lines as guides for positioning the plastic ridge cap. When installing the first piece allow the plastic ridge vent to extend beyond the gap opening by approximately 1 inch.
Fasten the plastic ridge cap to the roof using the appropriate nails recommended by the ridge cap manufacturer. Also make sure that the nails are fastened into the roof trusses or rafters, and not just the roof sheathing. Continue to install additional lengths of plastic ridge vent along the garage roof peak gap, leaving approximately 1/8” spacing between adjoining pieces. |
 |
The spacing between adjacent sections is necessary for expansion of the ridge vent. When installing the last section of ridge vent, again have it extend approximately 1” beyond the end of the gap.
Next install ridge cap shingles over the plastic ridge vent. You can create ridge cap shingles by cutting 3-tab shingles into thirds or you can purchase special ridge cap shingles. The ridge cap shingles are nailed to the plastic ridge cap, with each adjacent shingle cap covering the nails of the previous installed shingle cap. Use roofing nails that extend at least one inch into the plastic ridge cap. On the final shingle cap seal the exposed nails with either roofing tar or other appropriate roof sealer.
Once the ridge cap shingles have been installed your garage attic area should be cooler and the life of your garage shingles extended.
For more help on Shingling Your Home’s Roof, see HomeAdditionPlus.com’s Asphalt Shingle Roofing Bid Sheet. The Asphalt Shingle Roofing Bid Sheet will help to ensure that your roof won’t end up with a blue tarp over it and a dumpster sitting in your yard for weeks as you wait for the roofing contractor to come back and finish roofing your home.
Asphalt Shingle Roofing Cost Estimator
Related Roofing Information
- Discover Fiberglass Roofing Panels
- Why Pulling a Roofing Permit is Necessary
- Why you Should Remove Old Shingles before Installing the New Ones
Additional Roofing Resources from Amazon.com
 |
 |
 |
 |
Roofing Price Quotes For FREE, No Obligation!
Fill out our 3-5 minute quick and easy form, and receive a free price quote on roofing from one of our prescreened and licensed roofing contractors. This process is free and there is no obligation to continue once you receive your roofing price estimate.