Instructions on How to Paint a Ceiling
By Mark J. Donovan
|
|
Painting a ceiling is relatively simple for a homeowner to do, however it can get a little tiring on the back and shoulders.
To paint a ceiling, start by removing all the furniture from the room. Also remove all wall hangings and curtains from windows. Next, lay down one or more large drop cloths in the room. If the ceiling is a non-textured ceiling wipe it with a slightly damp cloth to remove any dust or debris. If the ceiling is textured, you may want to alternatively use a vacuum cleaner with a soft brush to remove dust or debris from it. |
Inspect the ceiling for any small holes or cracks. Use spackle, or a small container of joint compound, and a putty knife to fill in any holes or cracks.
Cutting the Ceiling
To begin painting the ceiling start by cutting around the perimeter of it. Cutting involves the use of a small 2-inch wide paint brush and painting around the perimeter of the ceiling.
Also, if there are any light fixtures or electrical boxes, you will need to cut around them as well.
When cutting a ceiling it is best to start in a corner and work your way around the room. I find, as a right-hander, working from left to right works best. Usually it works best to carry a small container of paint with you during this process, rather than keep reaching for a paint tray.
| To cut, simply apply paint on the paint brush, and holding the brush at approximately a 45 degree angle, apply it to the ceiling edge. As you apply the paint work the brush back and forth spreading it out and towards the ceiling and wall seam.
When complete, you should have approximately a 2-inch band around the perimeter of the ceiling. To cut around lights or light fixtures you may want to separate the light fixture from the electrical box. If you do, be sure to turn off power first. After the first coat has dried, repeat with a second coat. |
 |
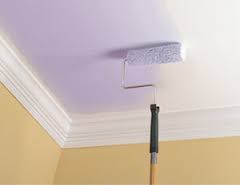
Rolling the Ceiling
After the second coat of cutting has dried you are now ready to roll the ceiling. Here you will use a 9-inch roller to spread the paint over the entire ceiling area.
To begin with, pour some paint into the roller tray, approximately ½ inch deep.
| Next, dip the paint roller into the deep end of the paint tray. Once paint is on the roller, roll it back up the paint tray into the shallower end and squeeze out some of the paint.
Again, beginning in a corner of the ceiling roll the paint onto the ceiling in long even strokes, slowly moving from left to right or visa-versa. The strokes should be 3-4 feet in length. Make sure you thoroughly coat the area before moving on. Repeat this process until you have completed painting the entire ceiling. Once the first coat has dried, apply a second coat. |
 |
After the second coat has dried, reconnect any light fixtures, pick up the drop clothes, put the furniture back in place, re-install the curtains and wall hangings and you are done.
See the Installing Interior Window Ebook from HomeAdditionPlus.com. The Installing Interior Window Trim Ebook provides easy to understand, step-by-step instructions, on how to install interior window trim around a window. Pictures are included for every key step in the process.
Related Information
- How to Repair a Small Drywall Ceiling Hole
- How to Remove Ceiling Water Stains Video
- Staining Wood Tips
Additional House Painting and Staining Resources from Amazon.com
 |
 |
Painting and Staining Price Quotes For FREE, No Obligation!
Fill out our 3-5 minute quick and easy form, and receive a free price quote on painting & staining from one of our pre-screened and licensed painting & staining contractors. This process is free and there is no obligation to continue once you receive your painting price estimate.