Diary of My First Major Home Improvement Venture
By Mark J. Donovan
|
|
Within our first year of marriage my wife and I bought our first home. Due to a preference to buy new home construction and limited savings we purchased an unfinished home. It was a two story gambrel style house with the upstairs completely unfinished. Suffice it to say the day we closed on that home my wife and I became DIY home improvement neophytes.
Growing up both of us had helped our parents on various home remodeling projects of their own. However none of those youthful diy home improvement experiences compared to what laid ahead for us in owning our first home. |
As with most first time homeowners we became diy home improvement neophytes for two main reasons, lack of money and a desire to accomplish something on our own, with admittedly the former being the chief reason.
Though the downstairs of our new home had all the essentials including a kitchen, bathroom, bedroom, living room and dining room it was cramped quarters. Consequently we were eager to begin finishing the upstairs of our new home. After sketching out a floor plan, I started making regular trips to the local home improvement store and purchasing 2x4s and nails. All I had for a vehicle was a Volkswagen Rabbit so I could only carry about 2 dozen 2x4s at a time.
| Due to the fact that I had some youthful home construction experiences I was able to frame the upstairs of our new home in a couple of weekends. To be honest, even for the complete diy home improvement neophyte, framing internal walls is one of the easiest home construction projects you can do. Compared to when I was finishing my home back then, there are an infinite amount of resources today at one’s fingertips, including HomeAdditionPlus.com, for providing framing instructions.
Once I completed the interior wall framing the upstairs really began to take shape and become a reality. However, I was far from done. |
 |
There were only a few electrical feeds from the main circuit panel coming into the upstairs for electricity, and just the roughed-in supply and drain lines for the plumbing. Again, more for a lack of money than anything else I chose to do my own electrical wiring and plumbing. Fortunately, I had some previous experience doing both of these projects as a teenager and I had a Bachelor of Science degree in Electrical Engineering.
Suffice it to say roughing in the electric was easy and roughing in the plumbing was not. The main difficulty with the plumbing was that it included baseboard hot water heating, so I had to run additional copper piping in crawl spaces and flooring to support the upstairs heating zone. I also had to route the plumbing pipes to the various locations for the bathroom fixtures which meant tearing up some of the subfloor. It was a lot of work and required a lot of soldering of joints.
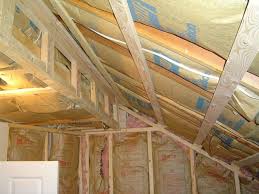
With all of the rough work completed I called in the local building inspector and got approval to move forward with insulating the exterior walls and ceiling. The home builder had installed insulation in the lower level ceiling to save money so there was no insulation in the walls or attic area of my new home. My wife and I spent two solid weekends insulating the upstairs of our home. Besides the drywall project, it is the second worst job to tackle on your own. Even fully clothed, and with masks and goggles on, we were still gasping for air and choking installing all of that fiberglass insulation. But we got it done, and I might add we did a good job. We past the next inspection with flying colors and were on to the drywall.
| The drywall phase of our upstairs project was a major endeavor. It took brawn and artistry and about 2 months of effort. I called in my father for helping to hang the drywall. Hanging drywall on the ceiling was particularly painful. All we used was a couple of homemade Ts made out of 2x4s to hold the drywall up while we nailed it in place. By the way, I broke down at that point and had the drywall delivered on a flat bed. I just couldn’t figure out a way to carry the drywall in or on my Volkswagen Rabbit. I did, however, bring home all of the rolls of insulation in that car.
Though I had the drywall delivered, I still had to haul it into the home and up the stairs. |
 |
Nearly 100 sheets of 4×8 drywall panels had to be carried up. Again we were diy home improvement neophytes that had more strength than money at the time, and admittedly less knowledge. Today I would have popped out an upper story window and have a crane lift and place the drywall panels into the upstairs area. Ah, by hindsight is 20/20. I continue on.
After hanging the drywall over a couple of weekends, we moved on to the taping and mudding stage. Both my wife and I tackled this project over many weekends and evenings. Taping and mudding drywall takes some practice and a bit of artistry. It’s also filthy and dusty work and I would not recommend it to anyone who had any other means to pay a pro to do it, at least if it’s a major drywall project as was the case with us. But we got through it and moved on to the finishing work of our upstairs.
| First we painted all of the walls and textured the ceiling. Rolling a ceiling gets pretty tough on the arms and neck, but after just a couple of weekends we had completed all of the painting.
I then moved on to the electric which basically involved installing the outlets, switches and light fixtures and turning on the circuit breakers that had originally been wired into the main circuit panel. Finishing the plumbing was a major endeavor. Installing the toilet and the bathroom vanity and sink were fairly easy, and the tub had fortunately been installed when the home was originally built. |
|
Once the fixtures were installed I simply needed to fasten the plumbing supply hoses to the supply lines and make the drainage connections. It was the installation of the baseboard heating that was the real pain. It was during this phase of the project where I had my first mishap. When I turned on water to the new heating zone I quickly discovered a leak in one of my solder joints. I doused the lower level ceiling pretty good with water but it dried out fairly nicely and required no repair. To solve my plumbing problem I had to drain the water from the heating zone and reflow the solder joint. It was a pain, but not the end of the world, which is the case with most diy home improvement projects.
Once the electric and plumbing were operational, I moved on to installing doors and doing interior trim work. The installation of the doors was easy as they were prehung doors. A level, hammer and some finishing nails made quick work of them. The closets required a bit more work as I had to box in their edges with trim and 1×5 lumber before installing the bifold doors. Similarly installing the interior window trim took some time. Fortunately I pre-stained all of the trim before installing it so I did save myself some time and hassles by not having to stain them on the walls after the fact.
After finishing all of the interior trim work we installed carpeting in the bedrooms and hallway, and tiled the bathroom floor. I left the installation of the carpeting to the pros, but I did the tiling myself.
So after about 5 months of hard work we moved into our newly finished upstairs. I estimated we saved about 50% of the cost of finishing the upstairs by tackling so much of it on our own. Besides the cost savings we also took a lot of pride in what we had accomplished. Even though we had been DIY home improvement neophytes, we had complete schedule and cost control of our home improvement project and we achieved exactly what we were looking for in our finished upstairs. In addition, we were able to avoid borrowing any money for completing it as we paid for it as we went along. We stayed in that house for only 2 years before, believe it or not, repeating the process again on another unfinished home. The sweat equity we had earned and the skills we learned allowed and emboldened us to sell our first home at a pretty penny and move up to a larger home and customize it even more.
For more help on building a home addition, see HomeAdditionPlus.com’s Home Addition Bid Sheets. Our Home Addition Bid Sheets provide you with the knowledge and information on how to plan a home building project, and what to look for when hiring contractors. They also include detailed cost breakdown tables and spreadsheets for estimating your own new home construction building costs.
Related Information
- Building a Mother In Law Room Addition
- Average Home Addition Costs
- Adding a Room over the Garage
- Custom Home Construction Costs
Free Home Addition Price Quotes with No Obligation!
Fill out our 3-5 minute quick and easy form, and receive a free price quote on a house addition from one of our prescreened and licensed home addition contractors. This process is free and there is no obligation to continue once you receive your home addition price estimate.