The Basic Steps and Components in a Framed Raised Floor System
By Mark J. Donovan
|
|
Raised floor framing consists of a system of sill plates, floor joists, joist headers, sheathing and blocking. A raised floor system offers numerous advantages over a concrete slab floor. First and foremost a raised floor gets the home off the ground, thus helping to protect a home from water and insect damage. A raised floor frame also enables an area underneath the home for installing electrical and mechanical equipment. In some cases the area underneath the house could be literally a basement or a crawl space.
Finally, a home that includes a raised floor frame simply offers more curb appeal by raising the house up off the ground a foot or two and making the home look more stately. |
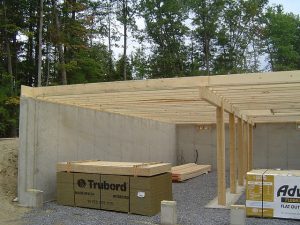
Raised floor framing begins with installing pressure treated lumber on top of the concrete foundation sill. Placed underneath the pressure treated lumber is a thin layer of moisture resistant blanket insulation to provide a tight seal between the concrete and the pressure treated lumber.
Resting on top of the pressure treated lumber is a second layer of non-pressure treated lumber to complete the sill plate. The sill plate lumber is anchored to the concrete foundation sill via bolts or metal straps that protrude upward from the concrete foundation sills.
| Any required center beams are then installed in between the foundation walls of the home and temporarily held up with lumber posts. Eventually the lumber posts are replaced with Lally columns (concrete filled metal tubes).
Once the sill plate has been attached to the concrete foundation sills and the center beam(s) is in position, floor joists can then be installed to span the distance between the sill and center beam(s). Typically floor joists are installed on 16 inch centers. The floor joists make up the heart of the raised floor framing. They normally are 2x10s or 2×12 boards that are placed on edge and run perpendicular to the foundation sill and center beam(s). They are capped off on the ends with joist headers. The floor joists are either nailed directly to the joist headers and sill plates, or joist hangers are used to tie them together. |
 |
Floor joist sizing is dependent upon building codes and the shape and style of the home. It is important that the proper floor joists are used to provide sufficient structural integrity of the home. The raised floor framing supports much of the weight of the home. Spliced floor joists should sufficiently overlap each other over the center beam and should be fastened together for maximum strength and rigidity. In splicing cases where there is no center beam, floor joists should be butted end-to-end and tied together with gusset plates.
| Where there are openings in the raised floor for stairways, floor joists should be doubled up around the perimeter of the opening and perpendicular joist headers installed to cap them off.
The next step in raised floor framing is to install the plywood sheathing on top of the floor joists. Typically ¾ inch tongue and groove plywood or OSB sheathing is used. The plywood or OSB sheathing boards are placed perpendicular over the floor joists. The sheathing is staggered from one row to the next to ensure a strong raised floor. An adhesive should be installed on top of the floor joists just prior to actually placing the sheets of plywood on them. The adhesive helps to ensure a better bond to the floor joists and prevent squeaks. |
 |
Finally, bracing is installed in between each floor joist bay to provide added rigidity to the raised floor system. If metal bracing is used, the metal bracing brackets should be installed prior to installing the raised floor sheathing.
For more help on building a home addition, see HomeAdditionPlus.com’s Home Addition Bid Sheets. Our Home Addition Bid Sheets provide you with the knowledge and information on how to plan a home building project, and what to look for when hiring contractors. They also include detailed cost breakdown tables and spreadsheets for estimating your own new home construction building costs.
Related Information
- What are Collar Ties Used For?
- Sistering Floor Joists
- Floor Joist Bracing Dramatically Reduces Deflection in Floors
Additional Framing Resources from Amazon.com
 |
 |
Free Home Addition Price Quotes with No Obligation!
Fill out our 3-5 minute quick and easy form, and receive a free price quote on a house addition from one of our prescreened and licensed home addition contractors. This process is free and there is no obligation to continue once you receive your home addition price estimate.