A how to guide for Framing a Rough Door Opening
By Mark J. Donovan
|
|
Installing a new door in your home can frequently require the need for framing. Described below is the process for framing a door opening.
Site Preparation for Framing a Door Opening Prior to any demolition make sure you have confirmed that all electricity has been turned off. Also make sure you have cleared the area of furniture and have laid a tarp down on the floor. |
If the wall is a weight-bearing wall, make sure you brace up the ceiling first before removing any of the existing studs. You can usually do this with a few 2x4s. Trace out the approximate door frame location on the wall for where your want to frame the door opening.
Site Demolition for Framing Door Opening
Next, using a carpenters knife score the sheetrock. Make sure you penetrate all the way through the sheetrock.
| Now remove the sheetrock with a hammer and claw. It is best to immediately dispose of the sheetrock to keep the jobsite clean.
Remove Required Studs and Sole Plate Section for Framing Rough Door Opening Next, mark on the top plate and bottom sole plate the rough door opening boundaries. Note, that the rough door opening should be about 2-3 inches wider and taller than the door itself. |
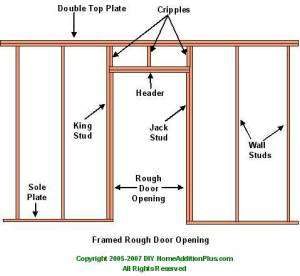 |
Also allow for an additional 3 inches to account for the width of 2 studs on each side of the door (King Stud and Jack Stud).
Now remove the stud(s) that lie within the marked rough door opening. You will also need to remove a section of the bottom sole plate.
Framing Rough Door Opening
Next install the King Studs. A King stud should sit on each side of the rough door opening and should connect the top and sole plates together. Toe nail them into position and use a level to make sure they are plumb.
| Next install Jack studs up against the two King studs. The Jack studs should be placed to the inside of the door opening and should have a height that is equal to the height of the door plus 2-3 inches.
The jack studs should be both toe nailed and nailed to the king jacks. Now install a Header that will rest on top of the Jack Studs. The header should consist of two 2×4 sections married/nailed together and laid flat on top of the Jack studs. Nail the header to the jack and king studs to form the frame of the rough door opening. |
Use this room addition checklist to save time, money and hassles on your building project. |
Finally add cripple studs over the header of the doorframe. One cripple stud should sit centered between the king studs and on top of the header. This cripple stud should be centered in the rough doorframe opening and should be toe nailed into the header and top plate. Also add cripple studs above the header and over each Jack stud.
If framed correctly the rough frame door opening should be complete and about 2-3 inches taller and wider than the door itself.
You have now completed framing a door opening and are ready for installing the door.
For more help on building a home addition, see HomeAdditionPlus.com’s Home Addition Bid Sheets. Our Home Addition Bid Sheets provide you with the knowledge and information on how to plan a home building project, and what to look for when hiring contractors. They also include detailed cost breakdown tables and spreadsheets for estimating your own new home construction building costs.
Related Information
Additional Framing Resources from Amazon.com
 |
 |
Free Home Addition Price Quotes with No Obligation!
Fill out our 3-5 minute quick and easy form, and receive a free price quote on a house addition from one of our prescreened and licensed home addition contractors. This process is free and there is no obligation to continue once you receive your home addition price estimate.