How to Instructions on Building a Window Seat
By Mark J. Donovan
|
|
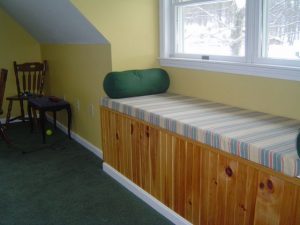
One of the most enjoyable features that I added to one of my homes was a window seat. I built the window seat underneath a large window that overlooked Lake Winnipesaukee. Not only has it turned out to be a great place to enjoy the views and to sit back and read a book, it also now serves as an excellent place for storing away seasonal holiday items.
Building a Window Seat Building a window seat is relatively simple to do. In my case the window was in a recessed dormer area that was about 18 inches deep, thus making it an ideal location for a window seat. |
Tools Required for Building a Window Seat
- Table Saw or Circular Saw
- Miter Saw
- Level
- Pencil
- Hammer
- Screw Driver
- Tape Measure
- Safety Glasses
- Paint Brush
Materials Required for Building a Window Seat
To begin with I framed an 18 inch high wall, using 2”x4” studs that connected both sides of the dormer. I attached this framed window seat wall to the dormer side walls; such that it was flush with the inner wall, thus creating an 18 inch deep seating area. |
 |
Next I used a level to create a line on the inside seat area walls, so that they were level, and at the same heath, with the newly framed wall. I then screwed in 2×4 segments along the inside walls relative to these lines.
After building the basic frame for the window seat, I next framed in a center section due to the fact that the window seat was nearly 7 feet in length. Again, I made a simple framing wall 18” in length, and 18” in height and fastened it to the inside of the framed seating area. I secured it to both the outer framed window seat wall and the back wall of the dormer. I also screwed it into the floor, as I had also done to the main window seat frame.
| Next I dressed up the top of the frame with 1”x2” select pine material. I used finish nails to attach the finished pine boards to the 2×4 frame.
For the exterior walls of the window seat, I installed 2” wide tongue and grooved wainscoting boards mounted on the vertical. To dress up the exterior of the window seat, I added some decorative moulding to both the top and bottom of the window seat, as well as on the corners. On the corners I actually used a wood corner bead. You could also use baseboard trim as well along the outside floor of the window seat. |
 |
For the top of the window seat, I used two 3/4” plywood panels cut to size, and then attached them to the back of the seat with hinges, after first painting them. I also drilled a single one inch hole in each panel near the front center of it, to enable the panel to be lifted.
Finally, I applied two coats of polyurethane to the wainscoting and my window seat was complete, except for the cushions.
Fabricating the Window Seat Cushions
For the window seat cushions we had to by a large section of 4” thick foam and some cloth material. My wife then created one large cushion that lays on top of the window seat. We also added a couple of pillows and the window seat was ready for use.
Dress Up Your Home with Crown Molding – For specific instructions on installing crown molding see the “Installing Crown Molding Ebook“. The “Installing Crown Molding Ebook” will show you how to properly measure, select, cut and install crown molding like a professional carpenter. It provides detailed instructions on every step in the process of installing crown molding and includes 28 instructional pictures! Order and Immediately Download today!. 100% Money-Back Guarantee if you are not satisfied.
For information on installing Window and Door trim see HomeAdditionPlus.com’s Installing Interior Window Trim Ebook and Installing Interior Door Trim Ebook. These Ebooks are loaded with pictures and provide easy to understand, step-by-step instructions, on how to install interior window and door trim.
Related Information
Additional Finish Carpentry Resources from Amazon.com
 |
 |
Free Home Addition Price Quotes with No Obligation!
Fill out our 3-5 minute quick and easy form, and receive a free price quote on a house addition from one of our prescreened and licensed home addition contractors. This process is free and there is no obligation to continue once you receive your house addition price estimate.