Tips on How to Caulk a Bathtub or Shower Stall
By Mark J. Donovan
|
|
One of the more artistic home improvement projects is caulking a bathtub or shower stall. Done correctly, you have an aesthetically attractive seam that will prevent water leakage around the bathtub or shower stall. Done incorrectly, you either wind up with a messy seam, a leaky seam, or both.
Summarized below are a few basic tricks to ensure that you have a functional and aesthetically attractive caulk seam. Make sure the Bathtub or Shower Stall Seam area is Clean In order to install a smooth caulk bead and ensure that it will totally seal the seam, the seam area must be spotlessly clean and dry. |
If you are replacing old caulk, you will need to first remove the old caulk. Pending the type of old caulk you may need to employ a caulking gun, a razor blade, a screwdriver, needle nose pliers, and even a hair dryer.
If the old caulk is hard feeling, it is probably a water based caulk. Use your needle nose pliers to try to remove it. If you are having difficulty extracting it, you may want to the employ the use of your hair dryer. Use the hair dryer to warm up the caulk. This will help aid in the removal of the caulk with the pliers. However, be careful not to overheat any particular area of the bathtub or shower stall. You could wind up scorching or damaging the surface if you apply the heat for too long in any one particular area.
| If the old caulk is flexible and spongy feeling it is probably silicone based. You will probably need the aid of a razor blade to remove it. Hold the razor blade at a low angle to cut through the edges of it, and then remove it with your needle nose pliers. Take care in this process to not scratch or damage the bathtub or shower stall. Once you have removed the old caulk, wash the area well with warm water and a mild detergent.Next wash the area with an alcohol based product to remove any residual old caulk films. |
 |
Note that new silicone caulk will not bond to old silicone caulk, thus it is critical that the seam area be spotlessly clean prior to caulking.
You should also wipe down the area with a mildew destroying solution to ensure no new mildew grows back along the seam.
If you are replacing the caulk due to water damage underneath it or on the tiles just above the seam, you may want to first fix the tiles before re-caulking. Alternatively, if there was a water problem due to a leak, and you do not plan on re-tiling first, then let the area dry out thoroughly prior to applying new caulk. This could take a matter of days, pending how wet the area was.
| Select the right Caulk for bathtub or Shower Stall Seam Application
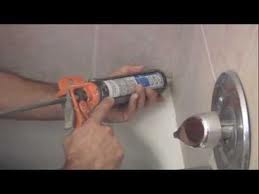
Once the seam area is clean and dry, it is time to apply the caulk. However not all caulks are the same. Some are meant for outdoor applications and some are meant for indoor applications. Others are also meant for moist areas and others are not. Caulks that are silicone based are flexible, whereas water-based caulks are not. Take care in selecting the correct caulk. Make sure you use a caulk meant for bathroom applications. Usually these types of caulks are mildew resistant. Applying the Caulk to the bathtub or Shower Stall Seam To apply the caulk, use a caulking gun. |
 |
Keep a roll of paper towels and a small pail of water nearby.
At a 45o angle, cut a small hole in the top of the caulk tube. You will also need to use a long nail or a long narrow screwdriver to crack the internal seal within the tube. Note, when caulking a bathtub or shower stall, you want to limit your caulk seam width to ¼ inch. Therefore, make sure the small hole you cut in the caulk tube, is indeed small. Otherwise you will create either larger seams or a mess. Note that silicone caulk is extremely difficult to remove, particularly off your hands.
| With the caulk tube loaded in the caulk gun, run a bead of caulk along the seam keeping the caulk gun at a 45o angle, and making sure the small hole stays flush up against the seam line. Once you have run the bead of caulk along the side, wet your finger in the water pail and quickly run your finger the length of the seam, pushing the caulk into the seam. Wipe the caulk from your hands with a moisten paper towel.You may also need to use some wet paper towels on the seam to dress it up, if you applied too much caulk. |
|
If you are caulking a shower stall, work from the inside out. Caulk the inside seams first, followed by the external ones. Also, caulk the vertical line first, followed by the horizontal lines. Caulk the vertical lines from top to bottom to ensure the best look.
After a 24-hour period the caulk should be dry enough to begin using the bathtub or shower stall.
For help on your bathroom remodeling project, see my Bathroom Remodeling Bid Sheet. The Bathroom Remodeling Bid Sheet provides a request for quote checklist section that you can provide to prospective bathroom remodeling contractors. It also includes a comprehensive bathroom remodeling cost breakdown table, in Microsoft Excel format, that allows the contractor to include his projected remodeling costs for every phase of the project.
Related Information
- What’s the Best Caulk to Use for Caulking Around Bathtubs and Showers
- Tips for How to Install a Bathtub and Shower Unit
- Bathroom Flooring Options
Additional Bathroom Remodeling Design Resources
 |
 |
Get Free Bathroom Remodeling Price Quotes with No Obligation!
Fill out our 3-5 minute quick and easy form, and receive a free price quote on bathroom remodeling from one of our prescreened and licensed bathroom remodeling contractors. This process is free and there is no obligation to continue once you receive your bathroom renovation price estimate.